- MyBatis의 설정 파일로, SQL 매퍼의 동작을 세부적으로 제어하는 데 사용됩니다.
<?xml version="1.0" encoding="UTF-8"?>
<!DOCTYPE configuration PUBLIC "-//mybatis.org//DTD Config 3.0//EN""http://mybatis.org/dtd/mybatis-3-config.dtd">
<!--
해당 파일은 Mybatis 관련 환경 설정을 하는 파일입니다.
-->
<configuration>
<settings>
<!-- column name to camel case-->
<setting name="mapUnderscoreToCamelCase" value="true"/>
<!-- 쿼리 결과 필드가 null인 경우, 누락이 되서 나오지 않게 설정-->
<setting name="callSettersOnNulls" value="true"/>
<!-- 쿼리에 보내는 파라미터가 null인 경우, 오류가 발생하는 것 방지 -->
<setting name="jdbcTypeForNull" value="NULL"/>
</settings>
</configuration>
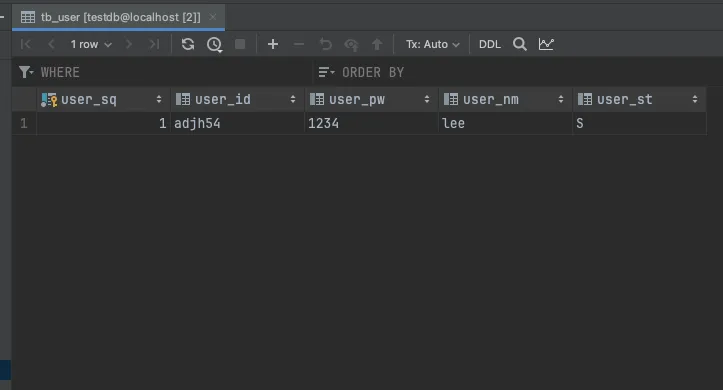
8. ddl.sql
💡 ddl.sql
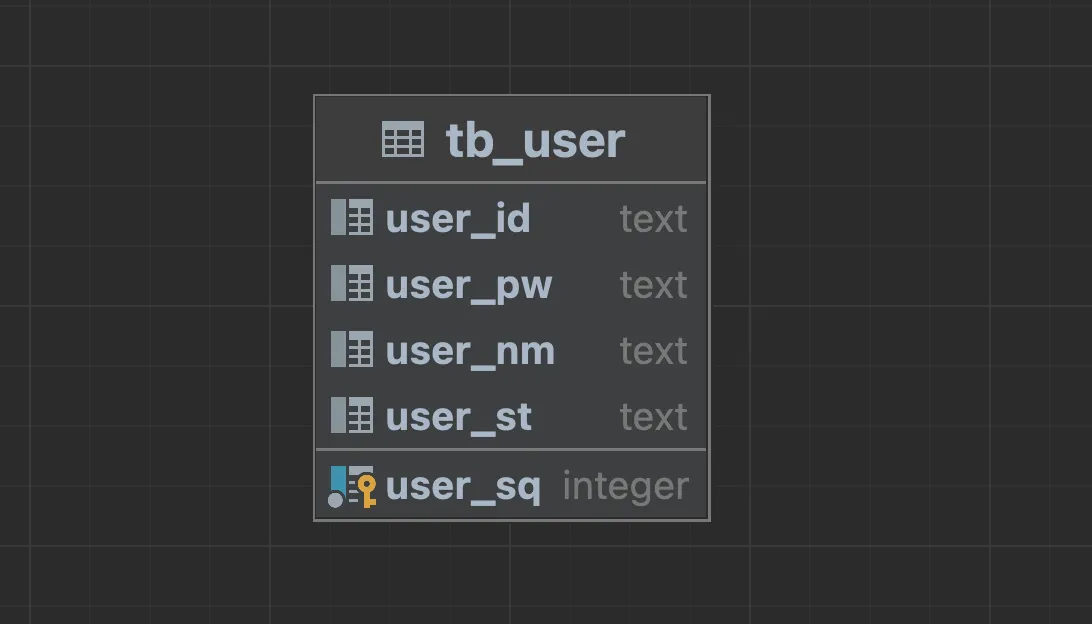
- tb_user 테이블을 생성하기 위한 DDL SQL 스크립트입니다.
createtable tb_user
(
user_sq serial
constraint tb_user_pk
primary key,
user_id text,
user_pw text,
user_nm text,
user_st text
);
altertable tb_user
owner to localmaster;
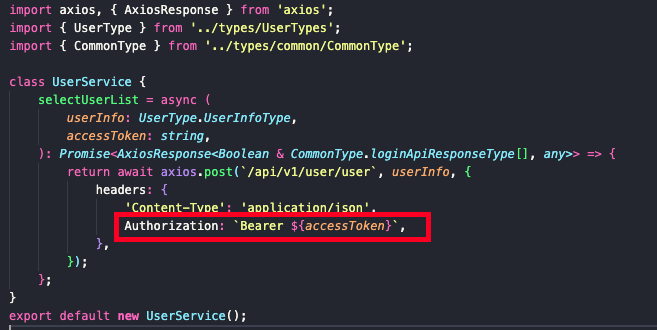
- 위에서 불러오는 고유한 JWT 키값을 환경설정 파일에서 지정을 합니다. - 해당 KEY는 반드시 32자 이상으로 문자로 구성이 되어야 합니다. 이는 HS256 알고리즘을 사용하는데에 권고 사항입니다.
# Spring Boot Custom Value
jwt:
  # 2. spring Boot Security + Key 설정(* 반드시 32이상 글자로 구성되어야 함)
  secret: 7Hs9x2mK4Lp6Rw3tYzAqBcDfGjNvXeUi
6. WebSecurityConfig
💡 WebSecurityConfig
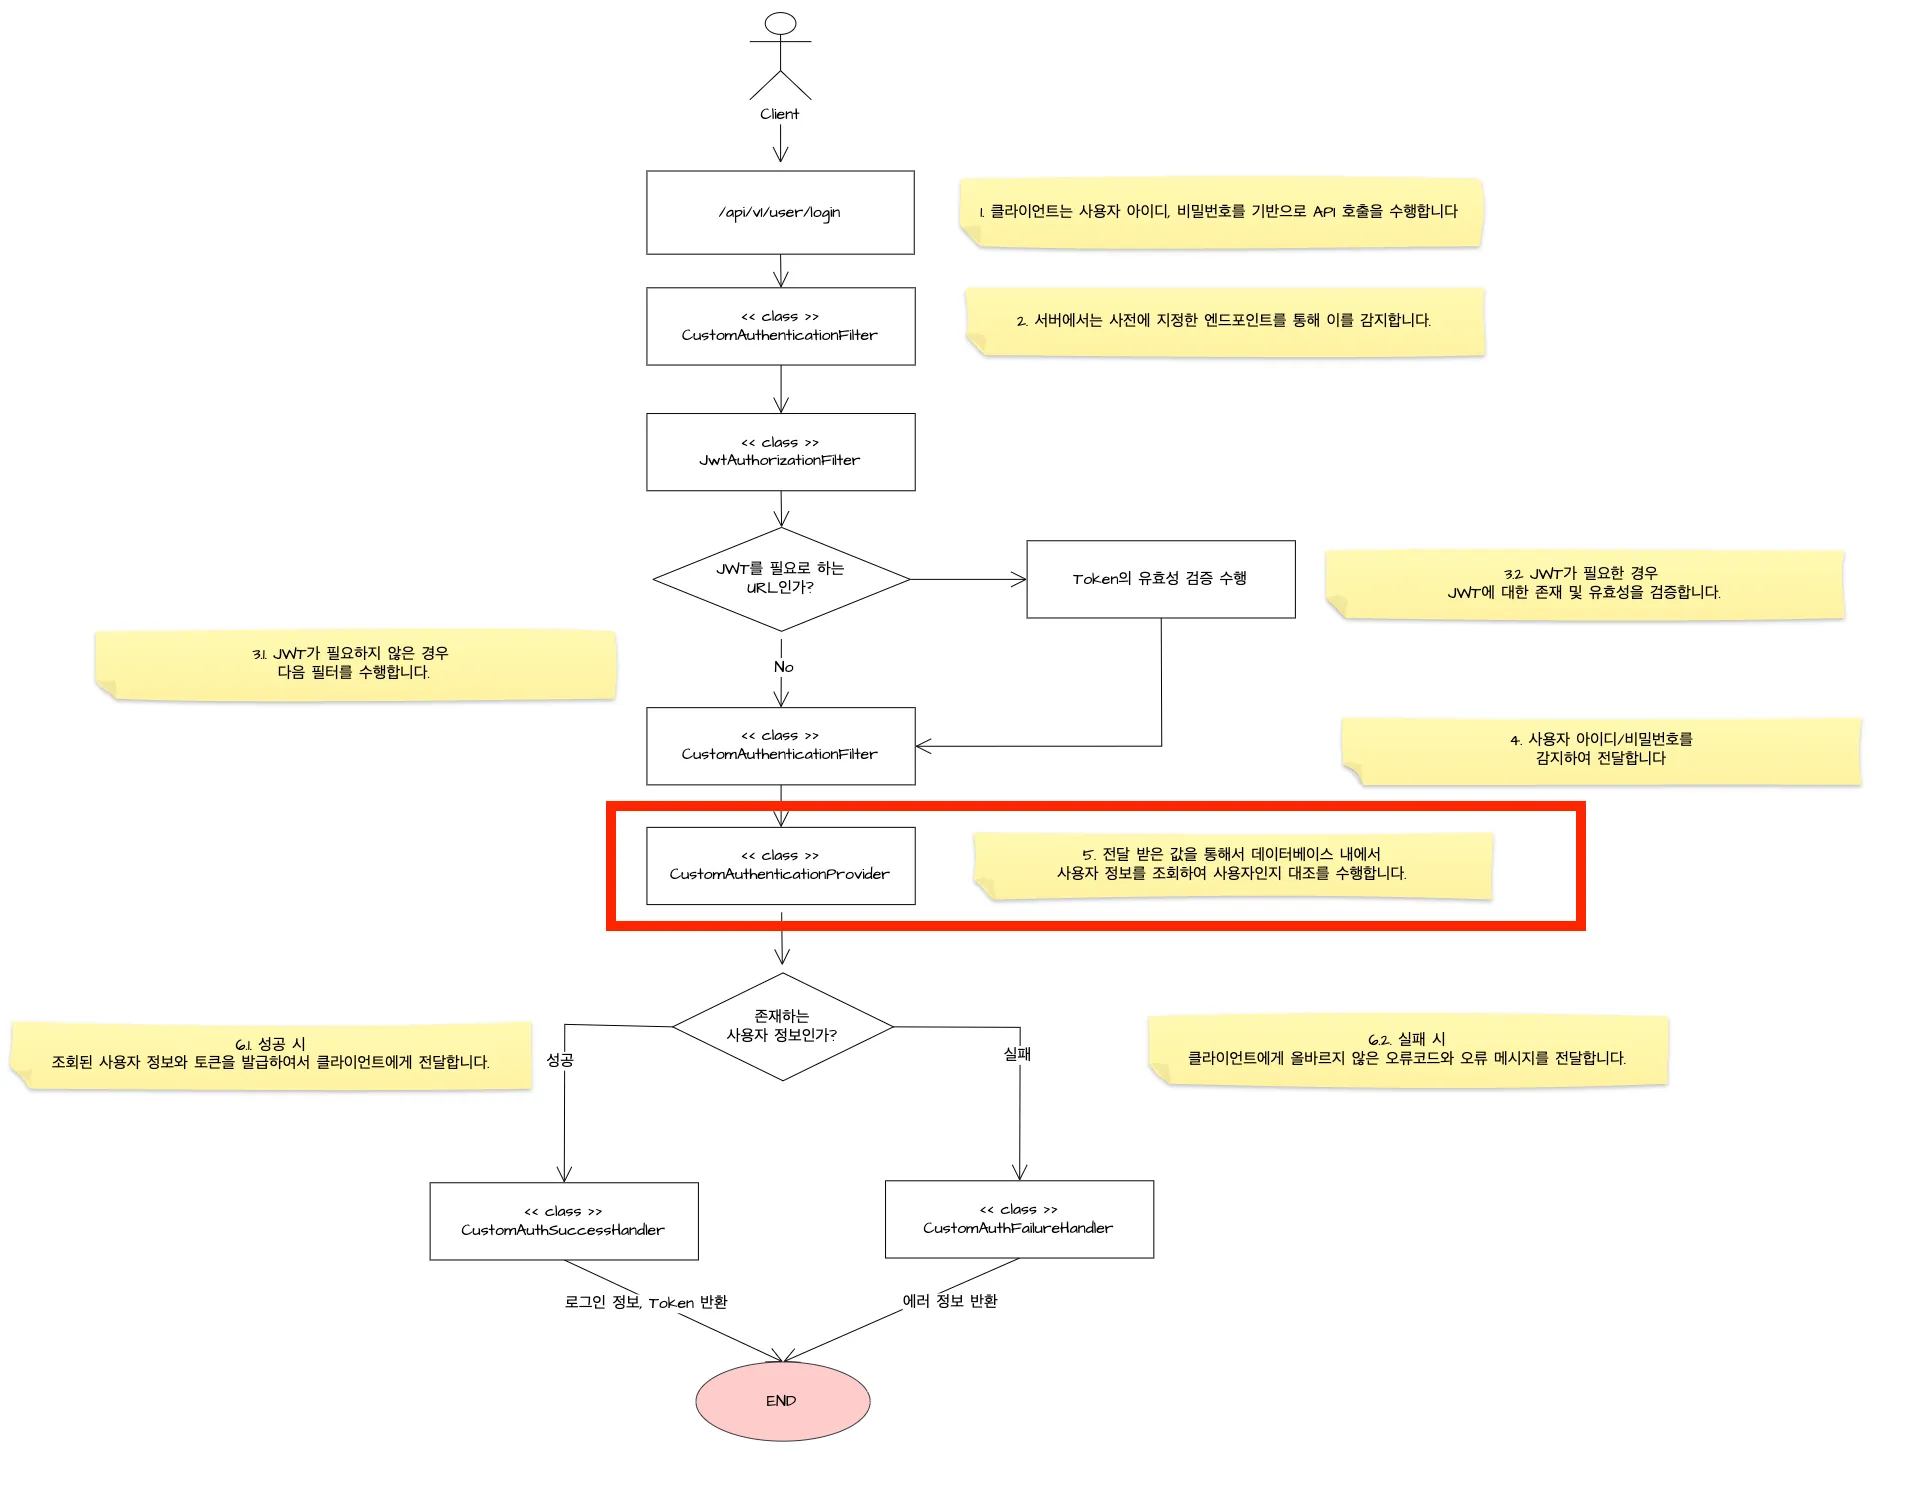
- Spring Security 환경 설정을 구성하기 위한 클래스입니다. - 웹 서비스가 로드될 때 Spring Container 의해 관리가 되는 클래스이며 사용자에 대한 ‘인증’과 ‘인가’에 대한 구성을 Bean 메서드로 주입을 합니다.
번호
메서드 명
설명
1
webSecurityCustomizer()
정적 자원(Resource)에 대해 인증된 사용자의 접근 '인가' 설정을 담당
2
securityFilterChain()
HTTP에 대한 '인증'과 '인가'를 담당하며, 인증 방식과 절차에 대한 설정을 수행
3
authenticationManager()
인증 메서드를 제공하는 매니저로, 'Provider'의 인터페이스 역할
4
customAuthenticationProvider()
'인증' 제공자로 사용자의 이름과 비밀번호를 데이터베이스에 제공하여 반환
5
bCryptPasswordEncoder()
비밀번호 암호화를 위한 BCrypt 인코딩 수행
6
customAuthenticationFilter()
커스텀 '인증' 필터로 접근 URL, 데이터 전달방식 등 인증 과정 및 처리 설정
7
customLoginSuccessHandler()
사용자 정보가 맞을 경우 수행되는 Handler
8
customLoginFailureHandler()
사용자 정보가 맞지 않을 경우 수행되는 Handler
9
jwtAuthorizationFilter()
JWT 토큰을 통한 사용자 인증
10
corsConfigurationSource()
Cors 관련되어서 커스텀 설정을 합니다.
package com.adjh.springboot3security.config;
import com.adjh.springboot3security.config.filter.CustomAuthenticationFilter;
import com.adjh.springboot3security.config.filter.JwtAuthorizationFilter;
import com.adjh.springboot3security.config.handler.CustomAuthFailureHandler;
import com.adjh.springboot3security.config.handler.CustomAuthSuccessHandler;
import com.adjh.springboot3security.config.handler.CustomAuthenticationProvider;
import lombok.extern.slf4j.Slf4j;
import org.springframework.boot.autoconfigure.security.servlet.PathRequest;
import org.springframework.context.annotation.Bean;
import org.springframework.context.annotation.Configuration;
import org.springframework.security.authentication.AuthenticationManager;
import org.springframework.security.authentication.ProviderManager;
import org.springframework.security.config.annotation.web.builders.HttpSecurity;
import org.springframework.security.config.annotation.web.configuration.EnableWebSecurity;
import org.springframework.security.config.annotation.web.configuration.WebSecurityCustomizer;
import org.springframework.security.config.annotation.web.configurers.AbstractHttpConfigurer;
import org.springframework.security.config.http.SessionCreationPolicy;
import org.springframework.security.crypto.bcrypt.BCryptPasswordEncoder;
import org.springframework.security.web.SecurityFilterChain;
import org.springframework.security.web.authentication.UsernamePasswordAuthenticationFilter;
import org.springframework.security.web.authentication.www.BasicAuthenticationFilter;
import org.springframework.web.cors.CorsConfiguration;
import org.springframework.web.cors.CorsConfigurationSource;
import org.springframework.web.cors.UrlBasedCorsConfigurationSource;
import java.util.List;
/**
* Spring Security 환경 설정을 구성하기 위한 설정 클래스입니다.
* 웹 서비스가 로드 될때 Spring Container 의해 관리가 되는 클래스이며 사용자에 대한 ‘인증’과 ‘인가’에 대한 구성을 Bean 메서드로 주입을 합니다.
*
* @author : jonghoon
* @fileName : WebSecurityConfig
* @since : 10/1/24
*/@Slf4j@Configuration@EnableWebSecuritypublicclassWebSecurityConfig{
/**
* 1. 정적 자원(Resource)에 대해서 인증된 사용자가 정적 자원의 접근에 대해 ‘인가’에 대한 설정을 담당하는 메서드입니다.
*
* @return WebSecurityCustomizer
*/@Beanpublic WebSecurityCustomizer webSecurityCustomizer(){
// 정적 자원에 대해서 Security를 적용하지 않음으로 설정return web -> web.ignoring().requestMatchers(PathRequest.toStaticResources().atCommonLocations());
}
/**
* 2. HTTP에 대해서 ‘인증’과 ‘인가’를 담당하는 메서드이며 필터를 통해 인증 방식과 인증 절차에 대해서 등록하며 설정을 담당하는 메서드입니다.
*
* @param http HttpSecurity
* @return SecurityFilterChain
* @throws Exception Exception
*/@Beanpublic SecurityFilterChain securityFilterChain(HttpSecurity http)throws Exception {
return http
.csrf(AbstractHttpConfigurer::disable) // CSRF 보호 비활성화
.cors(cors -> cors.configurationSource(corsConfigurationSource())) // CORS 커스텀 설정 적용
.authorizeHttpRequests(auth -> auth.anyRequest().permitAll()) // 우선 모든 요청에 대한 허용
.addFilterBefore(jwtAuthorizationFilter(), BasicAuthenticationFilter.class) // JWT 인증 (커스텀 필터)
.sessionManagement(session -> session.sessionCreationPolicy(SessionCreationPolicy.STATELESS)) // 세션 미사용 (JWT 사용)
.addFilterBefore(customAuthenticationFilter(), UsernamePasswordAuthenticationFilter.class) // 사용자 인증(커스텀 필터)
.formLogin(AbstractHttpConfigurer::disable) // 폼 로그인 비활성화
.build();
}
/**
* 3. authenticate 의 인증 메서드를 제공하는 매니져로'Provider'의 인터페이스를 의미합니다.
* - 과정: CustomAuthenticationFilter → AuthenticationManager(interface) → CustomAuthenticationProvider(implements)
*
* @return AuthenticationManager
*/@Beanpublic AuthenticationManager authenticationManager(){
returnnew ProviderManager(customAuthenticationProvider());
}
/**
* 4. '인증' 제공자로 사용자의 이름과 비밀번호를 데이터베이스에 제공하여 반환받습니다.
* - 과정: CustomAuthenticationFilter → AuthenticationManager(interface) → CustomAuthenticationProvider(implements)
*
* @return CustomAuthenticationProvider
*/@Beanpublic CustomAuthenticationProvider customAuthenticationProvider(){
returnnew CustomAuthenticationProvider(bCryptPasswordEncoder());
}
/**
* 5. 비밀번호를 암호화하기 위한 BCrypt 인코딩을 통하여 비밀번호에 대한 암호화를 수행합니다.
*
* @return BCryptPasswordEncoder
*/public BCryptPasswordEncoder bCryptPasswordEncoder(){
returnnew BCryptPasswordEncoder();
}
/**
* 6. 커스텀을 수행한 '인증' 필터로 접근 URL, 데이터 전달방식(form) 등 인증 과정 및 인증 후 처리에 대한 설정을 구성하는 메서드입니다.
*
* @return CustomAuthenticationFilter
*/@Beanpublic CustomAuthenticationFilter customAuthenticationFilter(){
CustomAuthenticationFilter customAuthenticationFilter = new CustomAuthenticationFilter(authenticationManager());
customAuthenticationFilter.setFilterProcessesUrl("/api/v1/user/login"); // 접근 URL
customAuthenticationFilter.setAuthenticationSuccessHandler(customLoginSuccessHandler()); // '인증' 성공 시 해당 핸들러로 처리를 전가한다.
customAuthenticationFilter.setAuthenticationFailureHandler(customLoginFailureHandler()); // '인증' 실패 시 해당 핸들러로 처리를 전가한다.
customAuthenticationFilter.afterPropertiesSet();
return customAuthenticationFilter;
}
/**
* 7. Spring Security 기반의 사용자의 정보가 '맞을 경우' 수행이 되며 결과값을 리턴해주는 Handler
*
* @return CustomLoginSuccessHandler
*/@Beanpublic CustomAuthSuccessHandler customLoginSuccessHandler(){
returnnew CustomAuthSuccessHandler();
}
/**
* 8. Spring Security 기반의 사용자의 정보가 '맞지 않을 경우' 수행이 되며 결과값을 리턴해주는 Handler
*
* @return CustomAuthFailureHandler
*/@Beanpublic CustomAuthFailureHandler customLoginFailureHandler(){
returnnew CustomAuthFailureHandler();
}
/**
* 9. JWT 토큰을 통하여서 사용자를 인증합니다.
*
* @return JwtAuthorizationFilter
*/@Beanpublic JwtAuthorizationFilter jwtAuthorizationFilter(){
returnnew JwtAuthorizationFilter();
}
/**
* 10. CORS에 대한 설정을 커스텀으로 구성합니다.
*
* @return CorsConfigurationSource
*/@Beanpublic CorsConfigurationSource corsConfigurationSource(){
CorsConfiguration configuration = new CorsConfiguration();
configuration.setAllowedOrigins(List.of("*")); // 허용할 오리진
configuration.setAllowedMethods(List.of("*")); // 허용할 HTTP 메서드
configuration.setAllowedHeaders(List.of("*")); // 모든 헤더 허용
configuration.setAllowCredentials(true); // 인증 정보 허용
configuration.setMaxAge(3600L); // 프리플라이트 요청 결과를 3600초 동안 캐시
UrlBasedCorsConfigurationSource source = new UrlBasedCorsConfigurationSource();
source.registerCorsConfiguration("/**", configuration); // 모든 경로에 대해 이 설정 적용return source;
}
}
7. JwtAuthorizationFilter
💡 JwtAuthorizationFilter
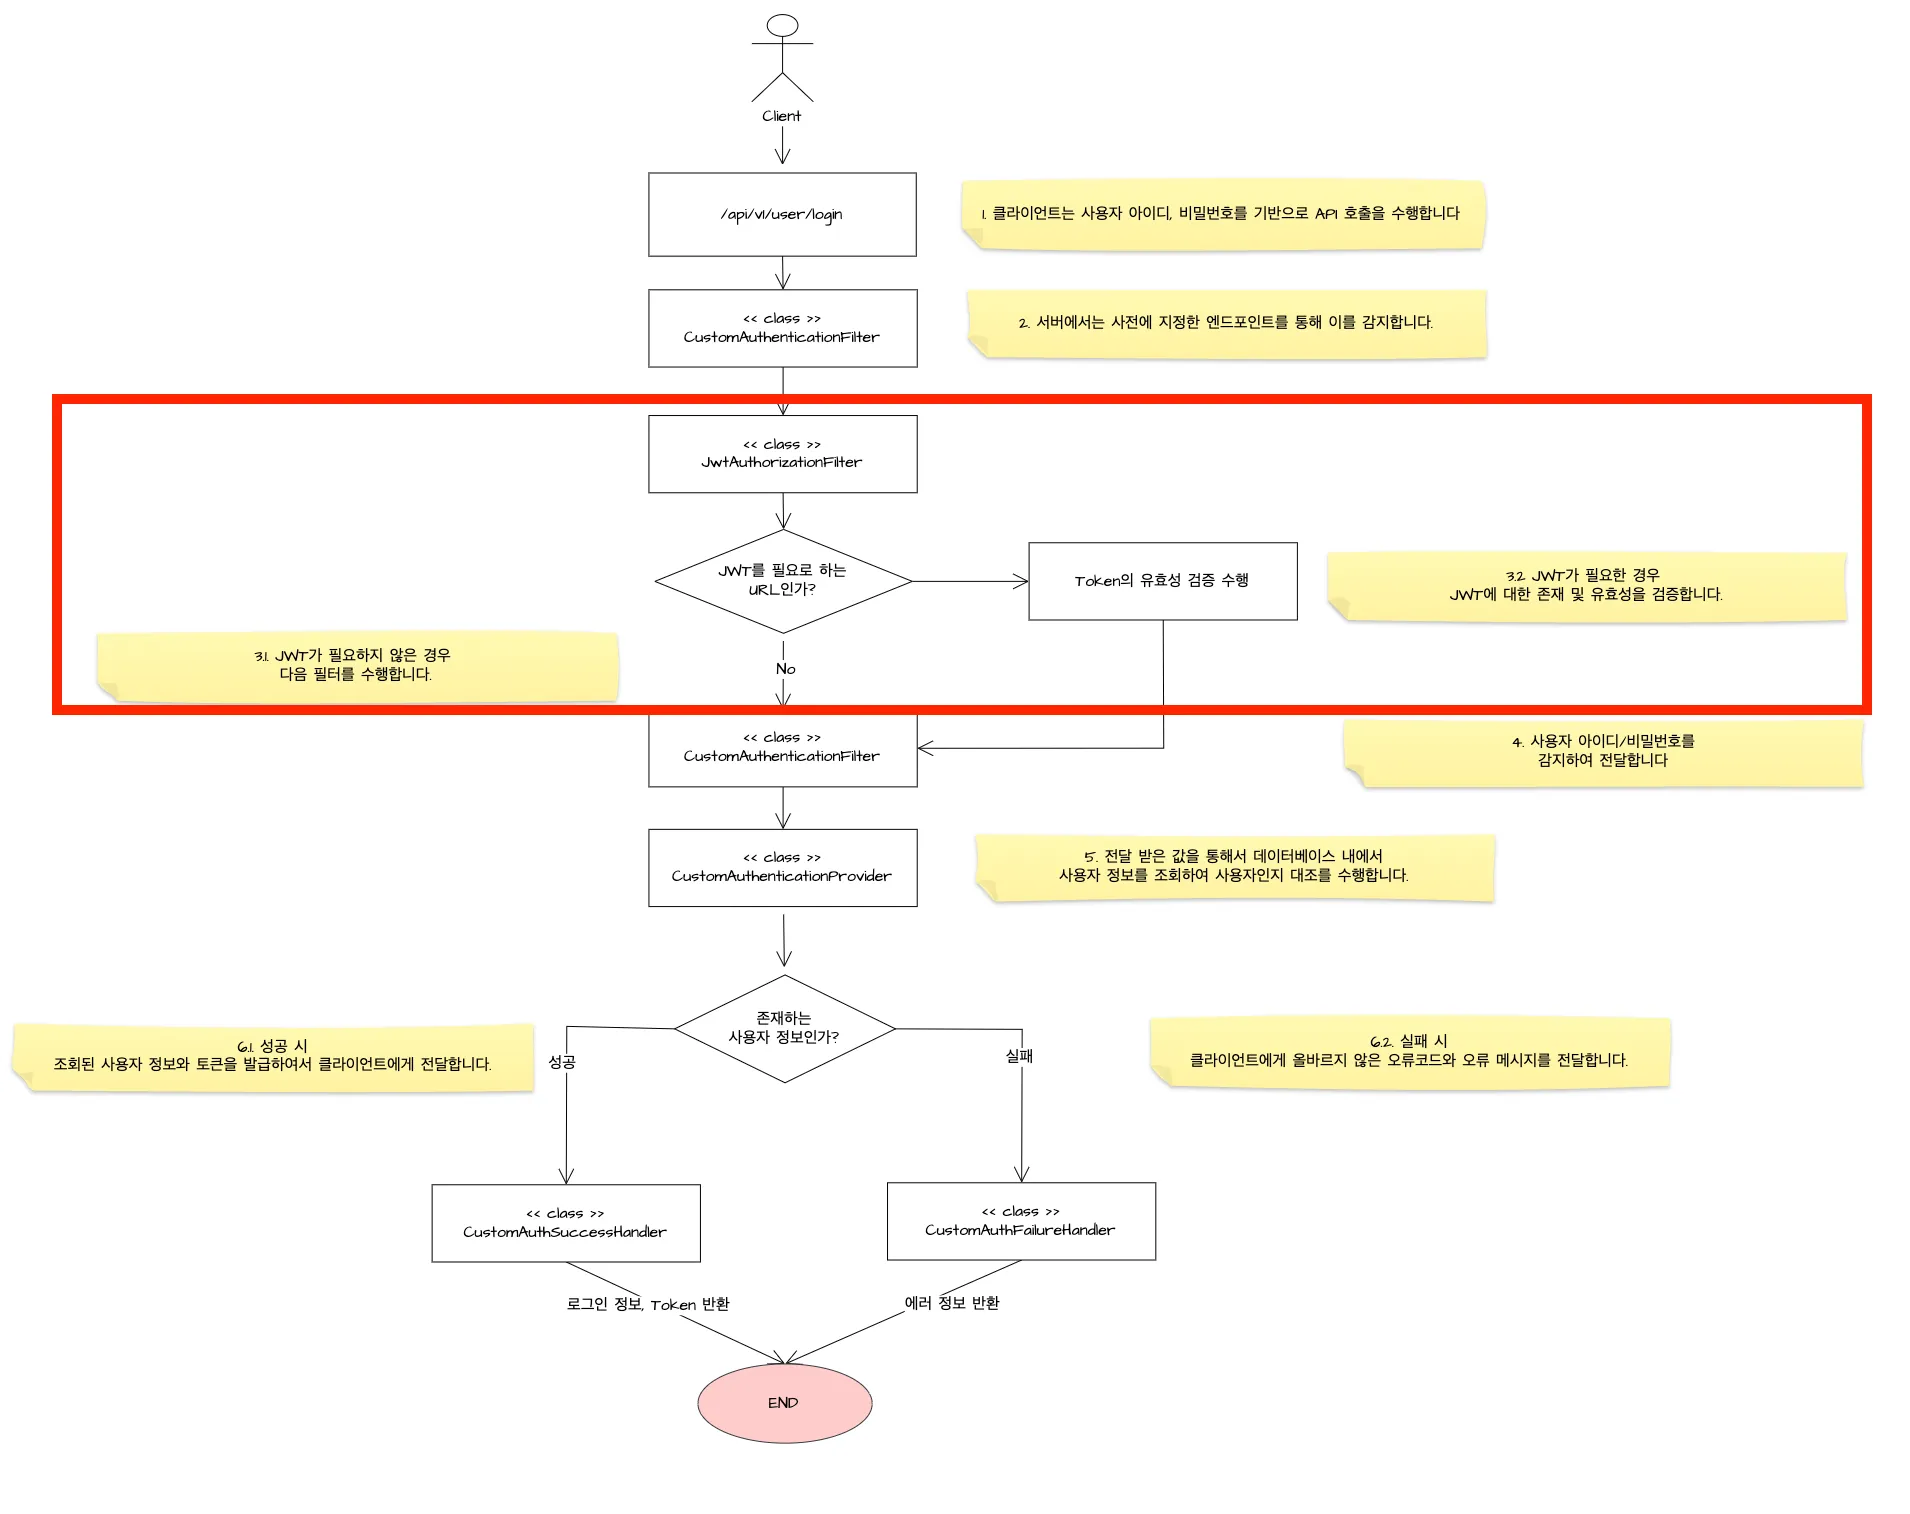
- Spring Security의 필터 체인에서 JWT(JSON Web Token) 인증을 처리하는 중요한 컴포넌트입니다. - JWT 토큰이 존재하지 않는 경우 다음 필터로 수행되도록 처리가 됩니다. - JWT 토큰이 존재하는 경우 유효한지에 대해 검증을 수행합니다.
메서드
설명
doFilterInternal
- JWT 인증 처리의 주요 로직을 수행합니다. - 토큰이 필요하지 않은 API 엔드포인트를 확인하고 처리합니다. - 클라이언트 요청의 Authorization 헤더에서 토큰을 추출하고 검증합니다. - 토큰이 유효한 경우 사용자 ID를 확인하고 다음 필터로 진행합니다. - 예외 발생 시 에러 응답을 생성합니다.
jwtTokenError
- JWT 관련 예외 발생 시 JSON 형태의 에러 응답을 생성합니다. - 토큰 만료, 잘못된 토큰, 기타 오류에 대한 메시지를 구성합니다. - 에러 상태, 코드, 메시지, 이유를 포함한 JSON 응답을 반환합니다.
package com.adjh.springboot3security.config.filter;
import com.adjh.springboot3security.common.utils.TokenUtils;
import com.fasterxml.jackson.core.JsonProcessingException;
import com.fasterxml.jackson.databind.ObjectMapper;
import io.jsonwebtoken.ExpiredJwtException;
import io.jsonwebtoken.JwtException;
import io.micrometer.common.util.StringUtils;
import jakarta.servlet.FilterChain;
import jakarta.servlet.ServletException;
import jakarta.servlet.http.HttpServletRequest;
import jakarta.servlet.http.HttpServletResponse;
import lombok.NonNull;
import lombok.extern.slf4j.Slf4j;
import org.springframework.stereotype.Component;
import org.springframework.web.filter.OncePerRequestFilter;
import java.io.IOException;
import java.io.PrintWriter;
import java.util.Arrays;
import java.util.HashMap;
import java.util.List;
import java.util.Map;
/**
* 지정한 URL 별 JWT 유효성 검증을 수행하며 직접적인 사용자 '인증'을 확인하는 필터 역할의 클래스입니다.
*
* @author : jonghoon
* @fileName : CustomAuthenticationFilter
* @since : 10/1/24
*/@Slf4j@ComponentpublicclassJwtAuthorizationFilterextendsOncePerRequestFilter{
privatestaticfinal String HTTP_METHOD_OPTIONS = "OPTIONS";
@OverrideprotectedvoiddoFilterInternal(HttpServletRequest request, @NonNull HttpServletResponse response, @NonNull FilterChain chain)throws IOException, ServletException {
// 1. 토큰이 필요하지 않는 경우에 대해 API Endpoint 관리
List<String> notUseJwtUrlList = Arrays.asList(
"/api/v1/user/login",
"/api/v1/token/token",
"/user/login",
"/token/token"
);
// 2. 토큰이 필요하지 않는 API 호출 발생 시 : 아래 로직 처리 없이 다음 필터로 이동if (notUseJwtUrlList.contains(request.getRequestURI())) {
chain.doFilter(request, response);
return;
}
// 3. 토큰이 필요없는 HTTP Method OPTIONS 호출 발생 시: 아래 로직 처리 없이 다음 필터로 이동if (request.getMethod().equalsIgnoreCase(HTTP_METHOD_OPTIONS)) {
chain.doFilter(request, response);
return;
}
// [STEP1] Client API 호출에서 "Authorization"를 속성을 확인합니다.
String header = request.getHeader("Authorization");
logger.debug("[+] header Check: " + header);
try {
// [STEP2-1] Header 내에 토큰이 존재하는 경우 : null, isEmpty() 체크 수행if (StringUtils.isNotBlank(header)) {
// [STEP2] Header 내에 토큰을 추출합니다.
String token = TokenUtils.getHeaderToToken(header);
System.out.println("추출된 토큰 :: " + token);
// [STEP3] 추출한 토큰이 유효한지 여부를 체크합니다.if (TokenUtils.isValidToken(token)) {
// [STEP4] 토큰을 기반으로 사용자 아이디를 반환 받는 메서드
String userId = TokenUtils.getClaimsToUserId(token);
logger.debug("[+] userId Check: " + userId);
// [STEP5] 사용자 아이디가 존재하는지 여부 체크if (StringUtils.isNotBlank(userId)) {
chain.doFilter(request, response); // 리소스로 접근
} else {
thrownew Exception("토큰 내에 사용자 아이디가 존재하지 않습니다"); // 사용자 아이디가 존재하지 않는 경우
}
} else {
thrownew Exception("토큰이 유효하지 않습니다."); // 토큰이 유효하지 않은 경우
}
} else {
thrownew Exception("토큰이 존재하지 않습니다."); // 토큰이 존재하지 않는 경우
}
}
// Token 내에 Exception 발생 하였을 경우 : 클라이언트에 응답값을 반환하고 종료합니다.catch (Exception e) {
response.setCharacterEncoding("UTF-8");
response.setContentType("application/json");
PrintWriter printWriter = response.getWriter();
String jsonResponse = jwtTokenError(e);
printWriter.print(jsonResponse);
printWriter.flush();
printWriter.close();
}
}
/**
* JWT 내에 Exception 발생 시 JSON 형태의 예외 응답값을 구성하는 메서드
*
* @param e Exception
* @return String
*/private String jwtTokenError(Exception e){
ObjectMapper objectMapper = new ObjectMapper();
Map<String, Object> jsonMap = new HashMap<>();
String resultMsg = "";
// [CASE1] JWT 기간 만료if (e instanceof ExpiredJwtException) {
resultMsg = "토큰 기간이 만료되었습니다.";
}
// [CASE2] JWT내에서 오류 발생 시elseif (e instanceof JwtException) {
resultMsg = "잘못된 토큰이 발급되었습니다.";
}
// [CASE3] 이외 JWT내에서 오류 발생else {
resultMsg = "OTHER TOKEN ERROR";
}
// Custom Error Code 구성
jsonMap.put("status", 403);
jsonMap.put("code", "9999");
jsonMap.put("message", resultMsg);
jsonMap.put("reason", e.getMessage());
try {
return objectMapper.writeValueAsString(jsonMap);
} catch (JsonProcessingException err) {
log.error("내부적으로 JSON Parsing Error 발생 " + err);
return"{}"; // 빈 JSON 객체를 반환
}
}
}
8. CustomAuthenticationFilter
💡 CustomAuthenticationFilter
- Security의 UsernamePasswordAuthenticationFilter를 확장하여 사용자 정의 인증 로직을 구현합니다. - 주로 폼 기반의 로그인 요청을 처리하고 인증 토큰을 생성하는 역할을 합니다.
- 지정된 URL로 form 전송을 했을 때 파라미터 정보를 가져옵니다. - AuthenticationManager를 사용하여 인증을 시도합니다.
getAuthRequest(HttpServletRequest request)
- Request로 받은 ID와 패스워드를 기반으로 인증 토큰을 발급합니다. - ObjectMapper를 사용하여 요청 본문에서 UserDto 객체를 추출합니다. - ID와 암호화된 패스워드로 UsernamePasswordAuthenticationToken을 생성합니다.
package com.adjh.springboot3security.config.filter;
import com.adjh.springboot3security.model.dto.UserDto;
import com.fasterxml.jackson.core.JsonParser;
import com.fasterxml.jackson.databind.ObjectMapper;
import jakarta.servlet.http.HttpServletRequest;
import jakarta.servlet.http.HttpServletResponse;
import lombok.extern.slf4j.Slf4j;
import org.springframework.security.authentication.AuthenticationManager;
import org.springframework.security.authentication.UsernamePasswordAuthenticationToken;
import org.springframework.security.core.Authentication;
import org.springframework.security.core.AuthenticationException;
import org.springframework.security.core.userdetails.UsernameNotFoundException;
import org.springframework.security.web.authentication.UsernamePasswordAuthenticationFilter;
import org.springframework.stereotype.Component;
/**
* 아이디와 비밀번호 기반의 데이터를 Form 데이터로 전송을 받아 '인증'을 담당하는 필터입니다.
*/@Slf4j@ComponentpublicclassCustomAuthenticationFilterextendsUsernamePasswordAuthenticationFilter{
publicCustomAuthenticationFilter(AuthenticationManager authenticationManager){
super.setAuthenticationManager(authenticationManager);
}
/**
* 지정된 URL로 form 전송을 하였을 경우 파라미터 정보를 가져온다.
*
* @param request from which to extract parameters and perform the authentication
* @param response the response, which may be needed if the implementation has to do a
* redirect as part of a multi-stage authentication process (such as OpenID).
* @return Authentication {}
* @throws AuthenticationException {}
*/@Overridepublic Authentication attemptAuthentication(HttpServletRequest request, HttpServletResponse response)throws AuthenticationException {
UsernamePasswordAuthenticationToken authRequest;
try {
authRequest = getAuthRequest(request);
setDetails(request, authRequest);
} catch (Exception e) {
thrownew RuntimeException(e);
}
returnthis.getAuthenticationManager().authenticate(authRequest);
}
/**
* Request로 받은 ID와 패스워드 기반으로 토큰을 발급한다.
*
* @param request HttpServletRequest
* @return UsernamePasswordAuthenticationToken
* @throws Exception e
*/private UsernamePasswordAuthenticationToken getAuthRequest(HttpServletRequest request)throws Exception {
try {
ObjectMapper objectMapper = new ObjectMapper();
objectMapper.configure(JsonParser.Feature.AUTO_CLOSE_SOURCE, true);
UserDto user = objectMapper.readValue(request.getInputStream(), UserDto.class);
log.debug("1.CustomAuthenticationFilter :: userId:" + user.getUserId() + " userPw:" + user.getUserPw());
// ID와 암호화된 패스워드를 기반으로 토큰 발급returnnew UsernamePasswordAuthenticationToken(user.getUserId(), user.getUserPw());
} catch (UsernameNotFoundException ae) {
thrownew UsernameNotFoundException(ae.getMessage());
}
}
}
9. CustomAuthenticationProvider
💡 CustomAuthenticationProvider
- 사용자의 인증을 수행하는 단계입니다. - 클라이언트로부터 전달받은 값을 기반으로 데이터베이스를 조회하여서 사용자에 대한 인증을 수행합니다.
메서드 명
설명
authenticate(Authentication authentication)
- 사용자 인증을 수행하는 메인 메서드입니다 - 전달받은 Authentication 객체에서 사용자 ID와 비밀번호를 추출합니다 - UserDetailsService를 통해 데이터베이스에서 사용자 정보를 조회합니다 - 비밀번호를 검증하고, 일치하지 않으면 BadCredentialsException을 발생시킵니다 - 인증이 성공하면 새로운 UsernamePasswordAuthenticationToken을 생성하여 반환합니다
supports(Class<?> authentication)
- 이 AuthenticationProvider가 지원하는 인증 토큰 타입을 확인합니다 - UsernamePasswordAuthenticationToken 클래스와 일치하는지 확인합니다
package com.adjh.springboot3security.config.handler;
import com.adjh.springboot3security.model.dto.UserDetailsDto;
import lombok.NonNull;
import lombok.RequiredArgsConstructor;
import lombok.extern.slf4j.Slf4j;
import org.springframework.beans.factory.annotation.Autowired;
import org.springframework.security.authentication.AuthenticationProvider;
import org.springframework.security.authentication.BadCredentialsException;
import org.springframework.security.authentication.UsernamePasswordAuthenticationToken;
import org.springframework.security.core.Authentication;
import org.springframework.security.core.AuthenticationException;
import org.springframework.security.core.userdetails.UserDetailsService;
import org.springframework.security.crypto.bcrypt.BCryptPasswordEncoder;
/**
* 전달받은 사용자의 아이디와 비밀번호를 기반으로 비즈니스 로직을 처리하여 사용자의 ‘인증’에 대해서 검증을 수행하는 클래스입니다.
* CustomAuthenticationFilter로 부터 생성한 토큰을 통하여 ‘UserDetailsService’를 통해 데이터베이스 내에서 정보를 조회합니다.
*/@Slf4j@RequiredArgsConstructorpublicclassCustomAuthenticationProviderimplementsAuthenticationProvider{
@Autowiredprivate UserDetailsService userDetailsService;
@NonNullprivate BCryptPasswordEncoder passwordEncoder;
@Overridepublic Authentication authenticate(Authentication authentication)throws AuthenticationException {
log.debug("2.CustomAuthenticationProvider");
UsernamePasswordAuthenticationToken token = (UsernamePasswordAuthenticationToken) authentication;
// 'AuthenticationFilter' 에서 생성된 토큰으로부터 아이디와 비밀번호를 조회함
String userId = token.getName();
String userPw = (String) token.getCredentials();
// Spring Security - UserDetailsService를 통해 DB에서 아이디로 사용자 조회
UserDetailsDto userDetailsDto = (UserDetailsDto) userDetailsService.loadUserByUsername(userId);
if (!(userDetailsDto.getUserPw().equalsIgnoreCase(userPw))) {
thrownew BadCredentialsException(userDetailsDto.getUserNm() + "Invalid password");
}
returnnew UsernamePasswordAuthenticationToken(userDetailsDto, userPw, userDetailsDto.getAuthorities());
}
//@Overridepublicbooleansupports(Class<?> authentication){
return authentication.equals(UsernamePasswordAuthenticationToken.class);
}
}
10. UserDetailsServiceImpl
💡UserDetailsServiceImpl
- 사용자 인증 정보를 로드하고 UserDetails 객체를 생성하는 역할을 담당합니다.
package com.adjh.springboot3security.service.impl;
import com.adjh.springboot3security.model.dto.UserDetailsDto;
import com.adjh.springboot3security.model.dto.UserDto;
import com.adjh.springboot3security.service.UserService;
import org.springframework.security.authentication.AuthenticationServiceException;
import org.springframework.security.authentication.BadCredentialsException;
import org.springframework.security.core.authority.SimpleGrantedAuthority;
import org.springframework.security.core.userdetails.UserDetails;
import org.springframework.security.core.userdetails.UserDetailsService;
import org.springframework.stereotype.Service;
import java.util.Collections;
/**
* UserDetailsService 구현체
* 사용자 인증 정보를 로드하고 UserDetails 객체를 생성하는 역할을 담당
*
* @author : jonghoon
* @fileName : UserDto
* @since : 10/1/24
*/@ServicepublicclassUserDetailsServiceImplimplementsUserDetailsService{
privatefinal UserService userService;
publicUserDetailsServiceImpl(UserService userService){
this.userService = userService;
}
/**
* 사용자 ID를 받아 해당 사용자의 인증 정보를 로드합니다.
*
* @param userId the username identifying the user whose data is required.
* @return
*/@Overridepublic UserDetails loadUserByUsername(String userId){
// [STEP1] 사용자 아이디를 조회하여 존재하지 않는 경우 오류를 반환합니다.if (userId == null || userId.isEmpty()) {
thrownew AuthenticationServiceException("사용자 ID가 비어있습니다.");
}
// [STEP2] 서비스를 호출하여 실제 데이터베이스 조회를 통해서 사용자 정보를 조회합니다.return userService.login(UserDto.builder().userId(userId).build())
.map(user -> new UserDetailsDto(user, Collections.singleton(new SimpleGrantedAuthority(user.getUserId()))))
.orElseThrow(() -> new BadCredentialsException("사용자 정보가 올바르지 않습니다: " + userId));
}
}
11. UserService
💡 UserService
- 사용자 정보를 조회해 오기 위한 인터페이스입니다.
package com.adjh.springboot3security.service;
import com.adjh.springboot3security.model.dto.UserDto;
import java.util.List;
import java.util.Optional;
/**
* 사용자 정보를 조회해오기 위한 인터페이스입니다.
*/publicinterfaceUserService{
Optional<UserDto> login(UserDto userVo);
List<UserDto> selectUserList(UserDto userDto);
}
12. CustomAuthSuccessHandler
💡 CustomAuthSuccessHandler
- 사용자의 '인증'에 대해 성공하였을 때, 수행하여 사용자에게 사용자 정보 및 JWT에 대한 응답 값을 제공해 주는 Handler입니다.
package com.adjh.springboot3security.config.handler;
import com.adjh.springboot3security.common.utils.TokenUtils;
import com.adjh.springboot3security.model.dto.UserDetailsDto;
import com.adjh.springboot3security.model.dto.UserDto;
import com.fasterxml.jackson.databind.ObjectMapper;
import jakarta.servlet.http.HttpServletRequest;
import jakarta.servlet.http.HttpServletResponse;
import lombok.extern.slf4j.Slf4j;
import org.springframework.context.annotation.Configuration;
import org.springframework.security.core.Authentication;
import org.springframework.security.web.authentication.SavedRequestAwareAuthenticationSuccessHandler;
import java.io.IOException;
import java.io.PrintWriter;
import java.util.HashMap;
import java.util.Map;
/**
* 사용자의 '인증'에 대해 성공하였을때, 수행하여 사용자에게 사용자 정보 및 JWT에 대한 응답 값을 제공해주는 Handler입니다.
*
* @author : jonghoon
* @fileName : CustomAuthenticationFilter
* @since : 10/1/24
*/@Slf4j@ConfigurationpublicclassCustomAuthSuccessHandlerextendsSavedRequestAwareAuthenticationSuccessHandler{
privatefinal ObjectMapper objectMapper = new ObjectMapper();
@OverridepublicvoidonAuthenticationSuccess(HttpServletRequest request, HttpServletResponse response,
Authentication authentication)throws IOException {
log.debug("3.1. CustomLoginSuccessHandler");
// [STEP1] 사용자와 관련된 정보를 모두 조회합니다.
UserDto userDto = ((UserDetailsDto) authentication.getPrincipal()).getUserDto();
// [STEP2] 응답 데이터를 구성합니다.
Map<String, Object> responseMap = new HashMap<>();
responseMap.put("userInfo", userDto);
// [STEP3] 사용자의 상태에 따라 응답 데이터를 설정합니다.if ("D".equals(userDto.getUserSt())) {
responseMap.put("resultCode", 9001);
responseMap.put("token", null);
responseMap.put("failMsg", "휴면 계정입니다.");
} else {
responseMap.put("resultCode", 200);
responseMap.put("failMsg", null);
String token = TokenUtils.generateJwtToken(userDto);
responseMap.put("token", token);
response.addHeader("Authorization", "BEARER " + token);
}
// [STEP4] 구성한 응답 값을 JSON 형태로 전달합니다.
response.setCharacterEncoding("UTF-8");
response.setContentType("application/json");
PrintWriter printWriter = response.getWriter();
printWriter.write(objectMapper.writeValueAsString(responseMap));
printWriter.flush();
printWriter.close();
}
}
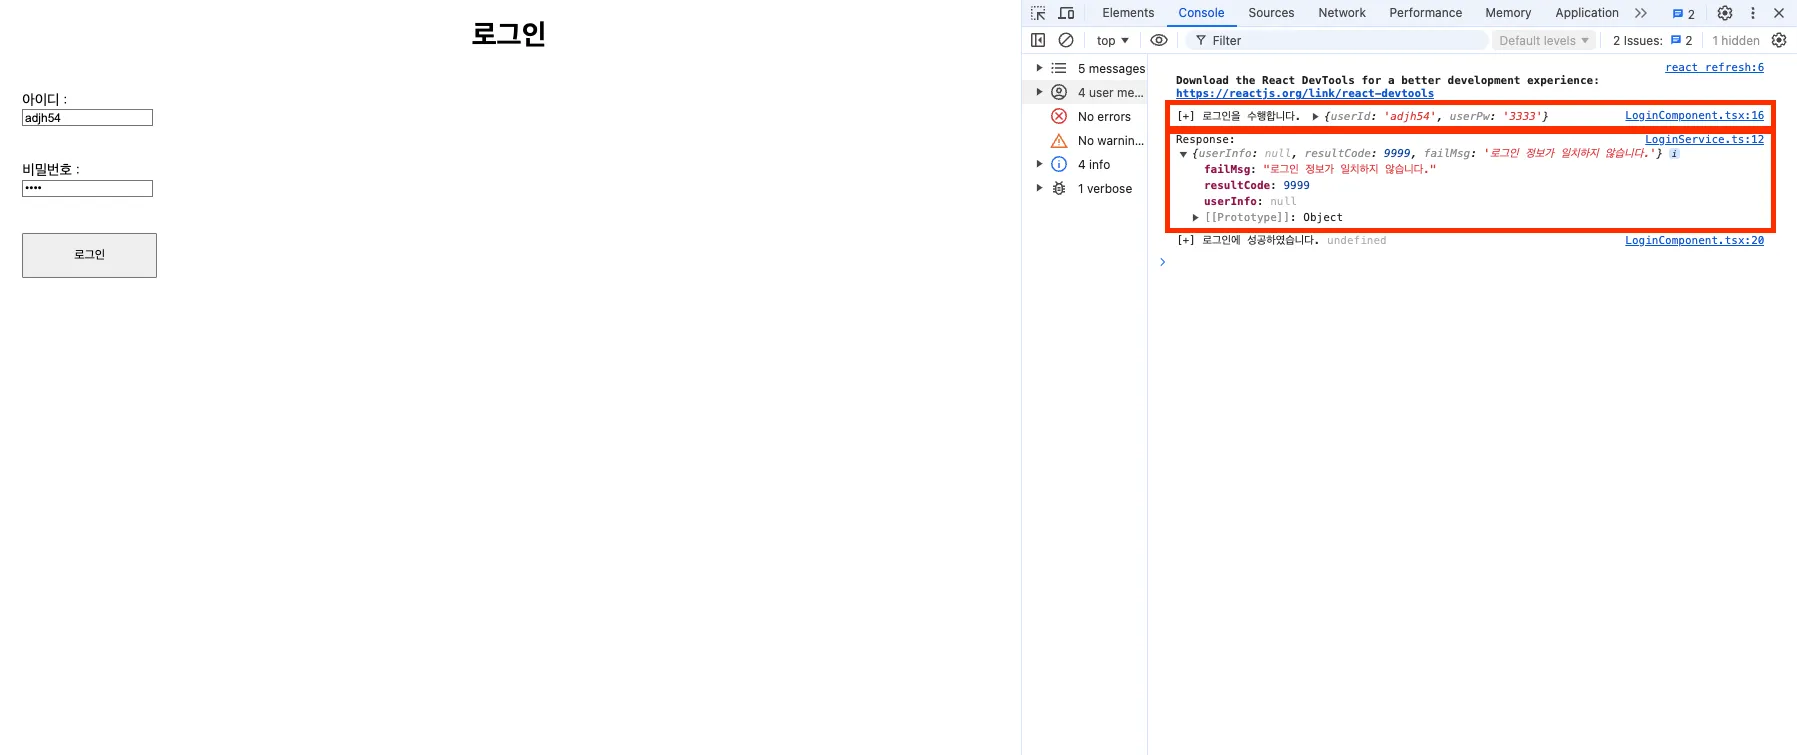
13. CustomAuthFailureHandler
💡 CustomAuthFailureHandler
- 사용자의 '인증'에 대해 실패하였을 때, 수행하여 사용자에게 응답 값을 제공해 주는 Handler입니다.
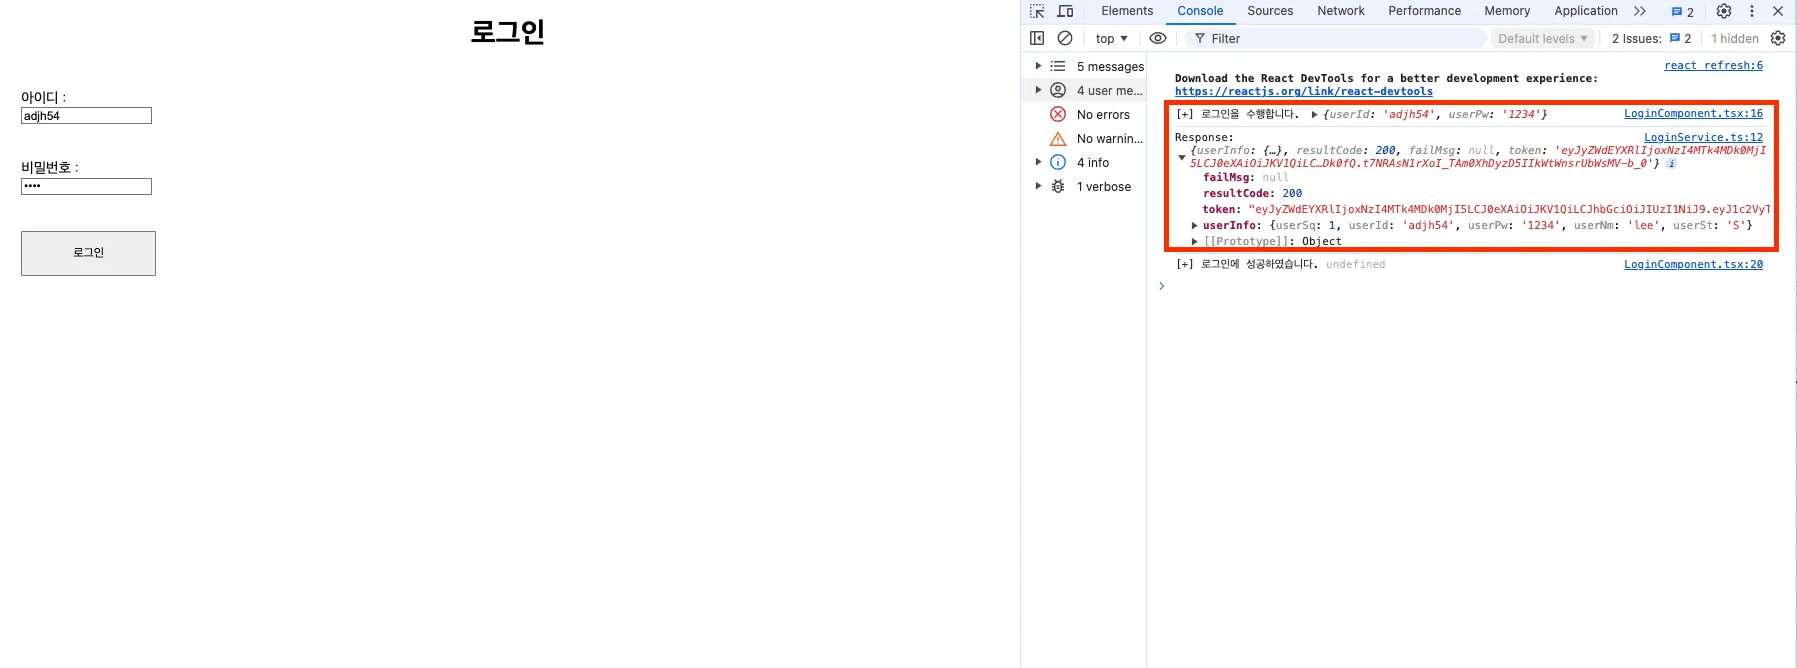
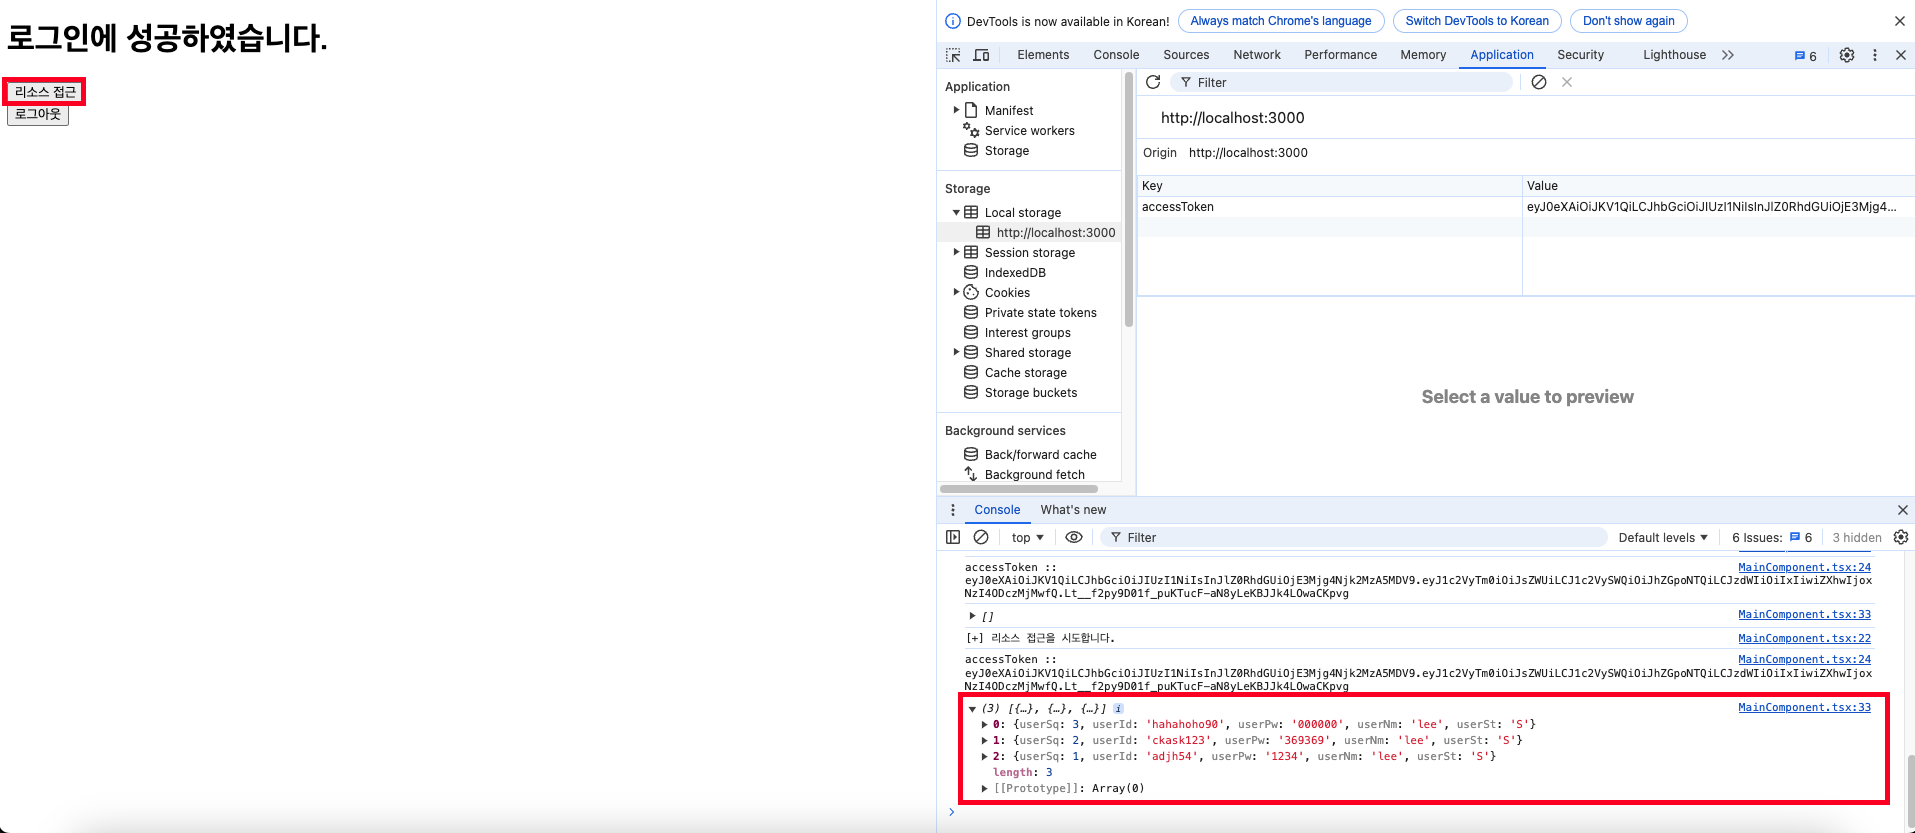
💡 API 서버 로그를 확인합니다. - CustomAuthenticationFilter → CustomAuthenticationProvider → (데이터베이스 조회) → CustomAuthFailureHandler 과정으로 수행이 됨이 확인되었습니다. - 최종적으로 데이터베이스 조회를 통해 인증이 되지 않은 사용자이기에 CustomAuthFailureHandler에서 처리하는 응답값을 클라이언트에게 반환하였습니다.
💡 API 서버 로그를 확인합니다. - CustomAuthenticationFilter → CustomAuthenticationProvider → (데이터베이스 조회) → CustomLoginSuccessHandler 과정으로 수행이 됨이 확인되었습니다. - 최종적으로 데이터베이스 조회를 통해 인증된 사용자이기에 CustomLoginSuccessHandler에서 처리하는 사용자 정보 + JWT를 응답값으로 클라이언트에게 반환하였습니다.