
[Java/Library] Spring Boot 2.x 환경에서 Swagger 이해하고 적용하기 : SpringDoc openAPI UI
해당 글에서는 Spring Boot 개발 환경에서 Swagger를 적용하는 방법에 대해서 설명합니다.

💡 [참고] Spring Boot 3.x 버전을 사용하시는 경우, 아래의 링크를 참고하셔야 합니다.
[Java] Spring Boot 3.x Swagger3 이해하고 적용하기 : SpringDoc OpenAPI Starter WebMVC UI 및 구성 방법
해당 글에서는 Spring Boot 3.x 버전 내에서 Swagger3을 SpringDoc OpenAPI Starter WebMVC UI를 통해 이해하고 설정하는 방법에 대해 알아봅니다.1) Swagger💡Swagger- RESTful 웹 서비스를 설계, 구축, 문서화 및 사
adjh54.tistory.com
💡 [참고] Swagger에 대해 상세히 궁금하시면 아래의 글을 참고하시면 도움이 됩니다.
| 분류 | 링크 |
| RESTful API 설계 방법 -1 : 이해하기 | https://adjh54.tistory.com/150 |
| RESTful API 설계 방법 -2 : 구성하기 | https://adjh54.tistory.com/151 |
| Spring Boot 2.x 환경에서 Swagger 이해하고 적용하기 : SpringDoc openAPI UI | https://adjh54.tistory.com/72 |
| Spring Boot 3.x 환경에서 Swagger3 이해하고 적용하기-1 : SpringDoc OpenAPI Starter WebMVC UI 및 구성 방법 | https://adjh54.tistory.com/561 |
| Spring Boot 3.x 환경에서 Swagger3 이해하고 적용하기 -2 : @RequestParam, @PathVariable, @RequestBody, @RequestHeader 정의 방법 | https://adjh54.tistory.com/618 |
| Spring Boot 환경에서 Swagger 예제 Repository | https://github.com/adjh54ir/blog-codes/tree/main/spring-boot-swagger |
1) Swagger
💡 Swagger
- RESTful 웹 서비스를 설계, 구축, 문서화 및 사용할 수 있는 오픈 소스 소프트웨어 프레임워크를 의미합니다.
- 이를 통해 API의 구조와 동작을 정의하기 위한 도구와 사양 세트를 제공하여 API를 개발하고 유지하는 것을 더욱 쉽게 만들어줍니다. API의 엔드포인트, 매개변수, 응답 등을 정의하고 문서화할 수 있습니다.
- 어노테이션을 기반으로 작동하고 사용이 되며 API의 구조와 동작에 대해 정의를 합니다. 또한 Swagger를 이용하기 위해서는 라이브러리인 SpringFox나 SpringDoc를 사용해야 합니다.
- Rest API에서 설계 과정 중 'API 문서화 단계'에서 이를 사용합니다.
💡 [참고] 공식사이트
About Swagger Specification | Documentation | Swagger
What Is OpenAPI? OpenAPI Specification (formerly Swagger Specification) is an API description format for REST APIs. An OpenAPI file allows you to describe your entire API, including: Available endpoints (/users) and operations on each endpoint (GET /users,
swagger.io
💡 [참고] 이전에 작성한 Restful API 설계 방법에 대해 궁금하시면 아래의 글을 참고하시면 도움이 됩니다.
[Java] RESTful API 설계 방법 -1 : 이해하기
해당 글에서는 Restful API에 대해서 이해하며 이를 통해 설계를 하는 방법에 대해서 이해하기 위해 작성한 글입니다. 1) REST / RESTful API 💡 REST(Representational State Transfer)란? - 웹 애플리케이션을 개발
adjh54.tistory.com
[Java] RESTful API 설계 방법 -2 : 구성하기
해당 글에서는 Restful API의 제약 조건과 설계 방법에 대해 이해한 것을 바탕으로 실제 RESTful API를 구성하는 목적으로 작성하였습니다. 💡 [참고] 이전에 작성한 Restful API 설계방법의 이론의 글에
adjh54.tistory.com
2) Swagger SpringFox / SpringDoc
💡 Swagger SpringFox / SpringDoc
- 스프링 부트 프로젝트를 사용하여 API 문서 생성을 자동화하는 데 사용이 됩니다.
- 해당 라이브러리를 사용하면 Swagger를 사용할 수 있는 UI 환경이 사용이 가능합니다.
💡 SpringFox vs SpringDoc
- 선발주자로 springfox가 시작이 되었고, 후발 주자로 springdoc-openapi가 나왔습니다.
- 아래 사진과 같이 springfox는 2020년 이후 업데이트를 수행하고 있지 않으며, springdoc-openapi는 현재 2022년까지 업데이트를 진행하고 있습니다.
💡 SpringFox Swagger2

[출처] https://mvnrepository.com/artifact/io.springfox/springfox-swagger2
💡 SpringDoc OpenAPI UI
[출처] https://mvnrepository.com/artifact/org.springdoc/springdoc-openapi-ui
1. SpringFox vs SpringDoc 비교
| 분류 | Spring fox | SpringDoc OpenAPI UI |
| 최종 업데이트 일자 | Jul 14, 2020 (작성일 기준) | Oct 17, 2022 (작성일 기준) |
| webflux 지원여부 | X | O |
| Swagger-UI 정렬 여부 | X | O (alpha, HTTP Method 별 정리 가능) |
[참고] Spring fox → springdoc-openapi Migration 방법
OpenAPI 3 Library for spring-boot
Library for OpenAPI 3 with spring boot projects. Is based on swagger-ui, to display the OpenAPI description.Generates automatically the OpenAPI file.
springdoc.org
💡 해당 글에서는 SpringDoc를 이용하여 Swagger를 선택하기로 결정하였습니다.
3) Swagger springdoc-openapi 주요 Annotation
💡 Swagger에서 사용하는 주요 어노테이션에 대해 각각 알아봅니다.
| 태그 | 속성 | 설명 |
| @Tag | Controller에 대한 설명을 명시하는 어노테이션 | |
| @Tag | name | API 그룹의 이름을 지정하는 속성 |
| @Tag | description | API 그룹의 설명을 지정하는 속성 |
| @Operation | API 그룹 내에 각각의 API를 명시하는 어노테이션 | |
| @Operation | summary | API에 대한 간략한 설명을 지정하는 속성 |
| @Operation | description | API에 대한 상세 설명을 지정하는 속성 |
| @Operation | response | API에 대한 응답을 지정하는 속성 |
| @Operation | parameter | API에 대한 파라미터를 지정하는 속성 |
| @Schema | 모델에 대한 설명을 명시하는 어노테이션 | |
| @Schema | description | 모델 자체 혹은 컬럼에 대한 설명을 하는 속성 |
4) Swagger springdoc-openapi 환경 설정
💡 Swagger springdoc-openapi 라이브러리를 이용하여서 환경설정을 합니다.
OpenAPI 3 Library for spring-boot
Library for OpenAPI 3 with spring boot projects. Is based on swagger-ui, to display the OpenAPI description.Generates automatically the OpenAPI file.
springdoc.org
1. 개발 환경
💡 Spring Boot 개발 환경에서 springdoc-openapi를 활용하는 개발환경입니다.
| 개발환경 | 버전 |
| java | 1.8 |
| Spring Boot | 2.7.4 |
| 빌드관리도구 | Gradle 7.5 |
| 개발 툴 | IntelliJ IDEA 2022.3 |
| Swagger | 3 |
| SpringDoc OpenAPI UI | 1.6.12 |
2. 빌드 관리도구에 라이브러리 추가
💡 의존성에 springdoc-openapi-ui를 추가합니다.
dependencies {
	implementation 'org.springdoc:springdoc-openapi-ui:1.6.12'
}
3. Config 파일 구성
💡 @Configuration 어노테이션을 통해서 OpenAPI 관련 문서를 생성한다.
import io.swagger.v3.oas.models.Components;
import io.swagger.v3.oas.models.OpenAPI;
import io.swagger.v3.oas.models.info.Info;
import org.springframework.context.annotation.Bean;
import org.springframework.context.annotation.Configuration;

/**
 * Swagger springdoc-ui 구성 파일
 */
@Configuration
public class OpenApiConfig {
    @Bean
    public OpenAPI openAPI() {
        Info info = new Info()
                .title("데모 프로젝트 API Document")
                .version("v0.0.1")
                .description("데모 프로젝트의 API 명세서입니다.");
        return new OpenAPI()
                .components(new Components())
                .info(info);
    }
}
4. application.properties 파일 구성
💡 .properties 파일로 구성하여도 되고, yml파일을 참조하여 .yml파일로 구성하여도 됩니다.
1-1. application.properties 파일로 구성하기
# Swagger springdoc-ui Configuration
springdoc.packages-to-scan=com.test.demo
springdoc.default-consumes-media-type=application/json;charset=UTF-8
springdoc.default-produces-media-type=application/json;charset=UTF-8
springdoc.swagger-ui.path=swagger-ui-bandee.html
springdoc.swagger-ui.tags-sorter=alpha
springdoc.swagger-ui.operations-sorter=alpha
springdoc.api-docs.path=/api-docs/json
springdoc.api-docs.groups.enabled=true
springdoc.cache.disabled=true
1-2. yaml 파일로 구성하기
# Swagger springdoc-ui Configuration
springdoc:
  packages-to-scan: com.test.demo
  default-consumes-media-type: application/json;charset=UTF-8
  default-produces-media-type: application/json;charset=UTF-8
  swagger-ui:
    path: demo-ui.html            # Swagger UI 경로 => localhost:8000/demo-ui.html
    tags-sorter: alpha            # alpha: 알파벳 순 태그 정렬, method: HTTP Method 순 정렬
    operations-sorter: alpha      # alpha: 알파벳 순 태그 정렬, method: HTTP Method 순 정렬
  api-docs:
    path: /api-docs/json
    groups:
      enabled: true
  cache:
    disabled: true
5. controller 설정
💡 Controller의 최상단에 @Tag 어노테이션과 @Operation 어노테이션을 추가한다.
(* 해당 어노테이션 설명은 하단에 있습니다.)
@Controller
@RequestMapping(value = "/api/v1/temp/")
@Tag(name = "Template", description = "템플릿 API Document")
public class TemplateController {

    // 필드 주입이 아닌 생성자 주입형태로 사용합니다. '생성자 주입 형태'로 사용합니다.
    private final TemplateService templateService;

    public TemplateController(TemplateService ts) {
        this.templateService = ts;
    }

    /**
     * [VIEW] Thymeleaf 화면 만을 출력하는 함수
     *
     * @param model 전송 할 데이터
     * @return 페이지
     */
    @GetMapping("main")
    @Operation(summary = "템플릿 화면", description = "템플릿 화면을 출력합니다.", tags = {"View"})
    public String selectTemplateView(Model model) {
        model.addAttribute("title", "템플릿 화면");
        return "temp/templatePage";
    }

    /**
     * [API] 템플릿 리스트 출력 함수
     *
     * @return ApiResponseWrapper<List < TemplateVO>> : 응답 결과 및 응답 코드 반환
     */
    @PostMapping("templateList")
    @Operation(summary = "템플릿 리스트", description = "템플릿의 모든 리스트를 조회합니다.")
    public ResponseEntity<ApiResponseWrapper<List<TemplateVO>>> selectTemplateList() {
        List<TemplateVO> resultList = templateService.selectTempList();
        ApiResponseWrapper<List<TemplateVO>> arw = new ApiResponseWrapper<>(resultList, SuccessCode.SELECT_SUCCESS.getStatus(), SuccessCode.SELECT_SUCCESS.getMessage());
        return new ResponseEntity<>(arw, HttpStatus.OK);
    }
}
6. VO 설정
@Getter
@Setter
@ToString
@NoArgsConstructor
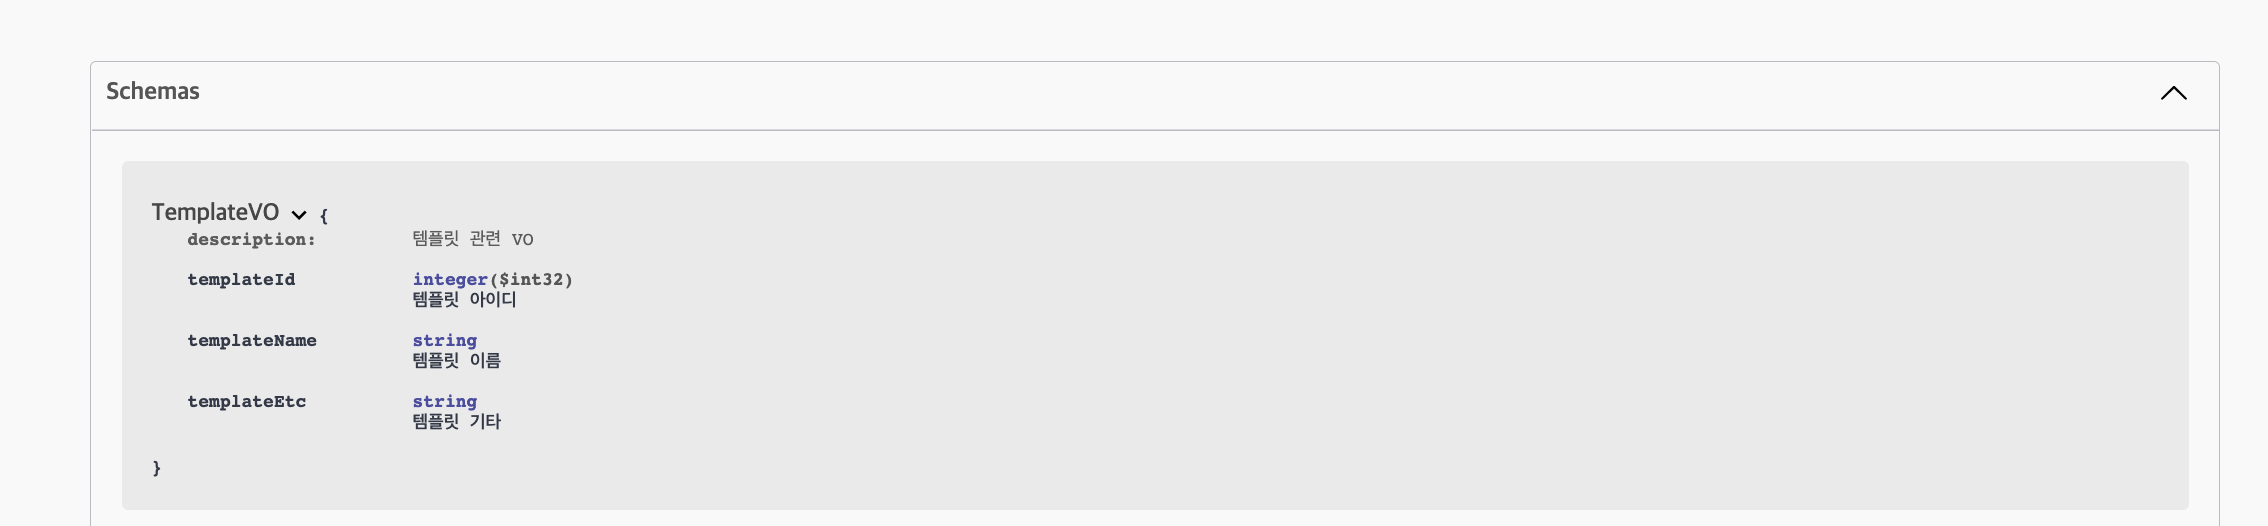
@Schema(description = "템플릿 관련 VO")
public class TemplateVO {
@Schema(description = "템플릿 아이디")
private Integer templateId;
@Schema(description = "템플릿 이름")
private String templateName;
@Schema(description = "템플릿 기타")
private String templateEtc;
}
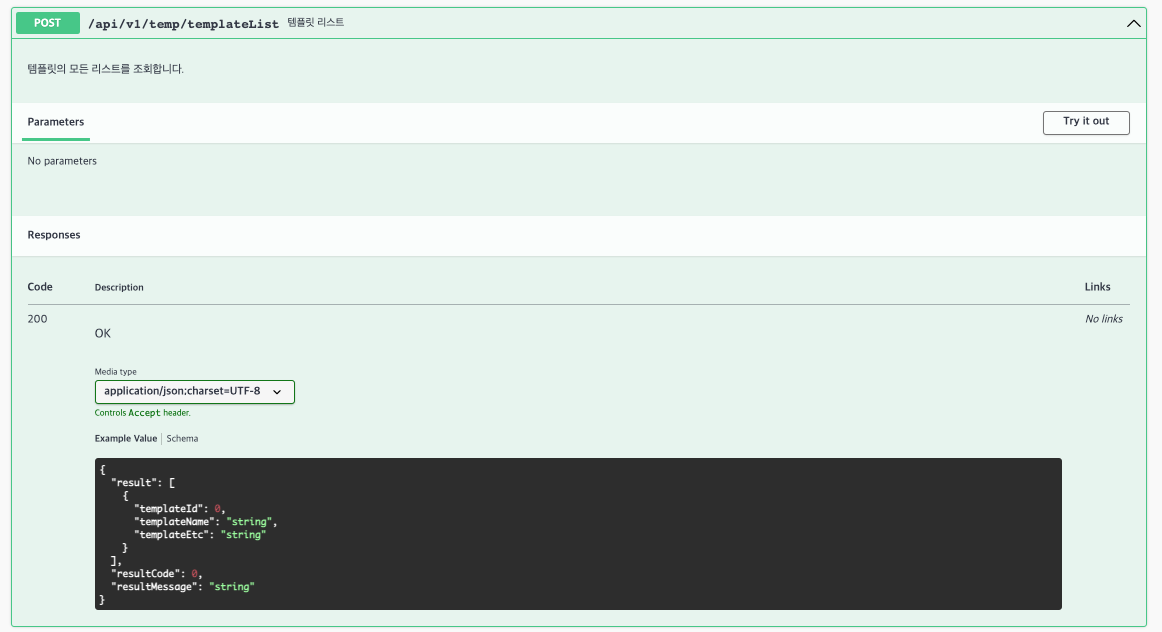
7. 결과 화면
💡 서버를 기동하고 http://localhost:8080/demo-ui.html로 접근을 합니다.
💡 Controller에 적용한 결과화면

💡VO 내에 적용한 결과화면
[참고] Swagger를 사용하기 위해 Restful API를 설계하는 방법에 대해 작성한 글을 공유드립니다.
[Java] Restful API 설계 방법 -1 : 이해하기
해당 글에서는 Restful API에 대해서 이해하며 이를 통해 설계를 하는 방법에 대해서 이해하기 위해 작성한 글입니다. 1) REST / RESTful API 💡 REST(Representational State Transfer) 이란? - 웹 어플리케이션을
adjh54.tistory.com
[Java] RESTful API 설계 방법 -2 : 구성하기
해당 글에서는 Restful API의 제약 조건과 설계 방법에 대해 이해한 것을 바탕으로 실제 RESTful API를 구성하는 목적으로 작성하였습니다. 💡 이전에 이해한 RESTful API 설계 방법을 기반으로 해당 글
adjh54.tistory.com
오늘도 감사합니다😀