<?xml version="1.0" encoding="UTF-8"?><!DOCTYPE mapperPUBLIC"-//mybatis.org//DTD Mapper 3.0//EN""http://mybatis.org/dtd/mybatis-3-mapper.dtd"><mappernamespace="com.adjh.multiflexapi.mapper.UserMapper"><!--로그인--><selectid="login"resultType="userDto">
SELECT t1.*
FROM multiflex_scma.tb_user t1
WHERE user_id = #{userId}
</select></mapper>
4) Spring Security 환경 설정 구현
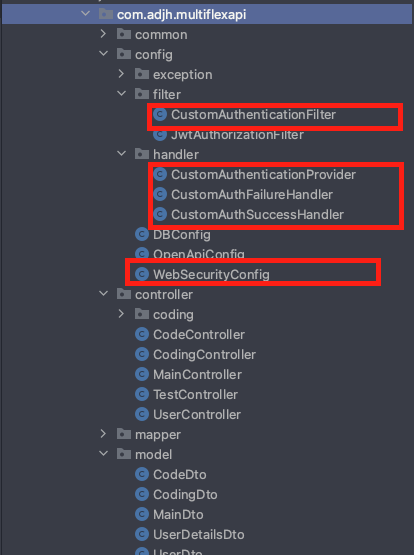
💡Spring Security 환경 설정
- Spring Security 환경 설정을 위한 폴더 구조에 대한 스크린샷입니다.
1. WebSecurityConfig.java
💡 WebSecurityConfig.java
- Spring Security의 환경설정을 구성하기 위한 클래스입니다.
- 웹 서비스가 로드될 때 Spring Container에 의해 관리가 되는 클래스이며 사용자에 대한 ‘인증’과 ‘인가’에 대한 구성을 Bean 메서드로 주입을 한다.
package com.adjh.multiflexapi.config;
import com.adjh.multiflexapi.config.filter.CustomAuthenticationFilter;
import com.adjh.multiflexapi.config.handler.CustomAuthFailureHandler;
import com.adjh.multiflexapi.config.handler.CustomAuthSuccessHandler;
import com.adjh.multiflexapi.config.handler.CustomAuthenticationProvider;
import lombok.extern.slf4j.Slf4j;
import org.springframework.boot.autoconfigure.security.servlet.PathRequest;
import org.springframework.context.annotation.Bean;
import org.springframework.context.annotation.Configuration;
import org.springframework.security.authentication.AuthenticationManager;
import org.springframework.security.authentication.ProviderManager;
import org.springframework.security.config.annotation.web.builders.HttpSecurity;
import org.springframework.security.config.annotation.web.configuration.EnableWebSecurity;
import org.springframework.security.config.annotation.web.configuration.WebSecurityCustomizer;
import org.springframework.security.config.http.SessionCreationPolicy;
import org.springframework.security.crypto.bcrypt.BCryptPasswordEncoder;
import org.springframework.security.web.SecurityFilterChain;
import org.springframework.security.web.authentication.UsernamePasswordAuthenticationFilter;
/**
* Spring Security 환경 설정을 구성하기 위한 클래스입니다.
* 웹 서비스가 로드 될때 Spring Container 의해 관리가 되는 클래스이며 사용자에 대한 ‘인증’과 ‘인가’에 대한 구성을 Bean 메서드로 주입을 한다.
*/@Slf4j@Configuration@EnableWebSecuritypublicclassWebSecurityConfig{
/**
* 1. 정적 자원(Resource)에 대해서 인증된 사용자가 정적 자원의 접근에 대해 ‘인가’에 대한 설정을 담당하는 메서드이다.
*
* @return WebSecurityCustomizer
*/@Beanpublic WebSecurityCustomizer webSecurityCustomizer(){
// 정적 자원에 대해서 Security를 적용하지 않음으로 설정return (web) -> web.ignoring().requestMatchers(PathRequest.toStaticResources().atCommonLocations());
}
/**
* 2. HTTP에 대해서 ‘인증’과 ‘인가’를 담당하는 메서드이며 필터를 통해 인증 방식과 인증 절차에 대해서 등록하며 설정을 담당하는 메서드이다.
*
* @param http HttpSecurity
* @return SecurityFilterChain
* @throws Exception Exception
*/@Beanpublic SecurityFilterChain securityFilterChain(HttpSecurity http)throws Exception {
// [STEP1] 서버에 인증정보를 저장하지 않기에 csrf를 사용하지 않는다.
http.csrf().disable();
// [STEP2] form 기반의 로그인에 대해 비 활성화하며 커스텀으로 구성한 필터를 사용한다.
http.formLogin().disable();
// [STEP3] 토큰을 활용하는 경우 모든 요청에 대해 '인가'에 대해서 사용.
http.authorizeHttpRequests((authz) -> authz.anyRequest().permitAll());
// [STEP4] Spring Security Custom Filter Load - Form '인증'에 대해서 사용
http.addFilterBefore(customAuthenticationFilter(), UsernamePasswordAuthenticationFilter.class);
// [STEP5] Session 기반의 인증기반을 사용하지 않고 추후 JWT를 이용하여서 인증 예정
http.sessionManagement().sessionCreationPolicy(SessionCreationPolicy.STATELESS);
// [STEP6] Spring Security JWT Filter Load// http.addFilterBefore(jwtAuthorizationFilter(), BasicAuthenticationFilter.class);// [STEP7] 최종 구성한 값을 사용함.return http.build();
}
/**
* 3. authenticate 의 인증 메서드를 제공하는 매니져로'Provider'의 인터페이스를 의미합니다.
* - 과정: CustomAuthenticationFilter → AuthenticationManager(interface) → CustomAuthenticationProvider(implements)
*
* @return AuthenticationManager
*/@Beanpublic AuthenticationManager authenticationManager(){
returnnew ProviderManager(customAuthenticationProvider());
}
/**
* 4. '인증' 제공자로 사용자의 이름과 비밀번호가 요구됩니다.
* - 과정: CustomAuthenticationFilter → AuthenticationManager(interface) → CustomAuthenticationProvider(implements)
*
* @return CustomAuthenticationProvider
*/@Beanpublic CustomAuthenticationProvider customAuthenticationProvider(){
returnnew CustomAuthenticationProvider(bCryptPasswordEncoder());
}
/**
* 5. 비밀번호를 암호화하기 위한 BCrypt 인코딩을 통하여 비밀번호에 대한 암호화를 수행합니다.
*
* @return BCryptPasswordEncoder
*/public BCryptPasswordEncoder bCryptPasswordEncoder(){
returnnew BCryptPasswordEncoder();
}
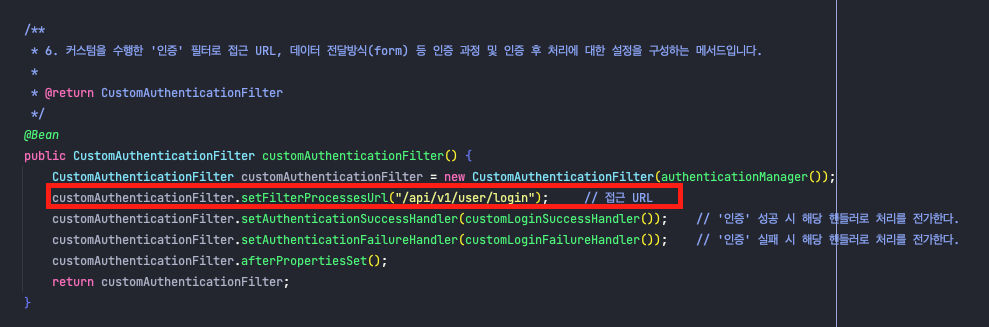
/**
* 6. 커스텀을 수행한 '인증' 필터로 접근 URL, 데이터 전달방식(form) 등 인증 과정 및 인증 후 처리에 대한 설정을 구성하는 메서드입니다.
*
* @return CustomAuthenticationFilter
*/@Beanpublic CustomAuthenticationFilter customAuthenticationFilter(){
CustomAuthenticationFilter customAuthenticationFilter = new CustomAuthenticationFilter(authenticationManager());
customAuthenticationFilter.setFilterProcessesUrl("/api/v1/user/login"); // 접근 URL
customAuthenticationFilter.setAuthenticationSuccessHandler(customLoginSuccessHandler()); // '인증' 성공 시 해당 핸들러로 처리를 전가한다.
customAuthenticationFilter.setAuthenticationFailureHandler(customLoginFailureHandler()); // '인증' 실패 시 해당 핸들러로 처리를 전가한다.
customAuthenticationFilter.afterPropertiesSet();
return customAuthenticationFilter;
}
/**
* 7. Spring Security 기반의 사용자의 정보가 맞을 경우 수행이 되며 결과값을 리턴해주는 Handler
*
* @return CustomLoginSuccessHandler
*/@Beanpublic CustomAuthSuccessHandler customLoginSuccessHandler(){
returnnew CustomAuthSuccessHandler();
}
/**
* 8. Spring Security 기반의 사용자의 정보가 맞지 않을 경우 수행이 되며 결과값을 리턴해주는 Handler
*
* @return CustomAuthFailureHandler
*/@Beanpublic CustomAuthFailureHandler customLoginFailureHandler(){
returnnew CustomAuthFailureHandler();
}
/**
* 9. JWT 토큰을 통하여서 사용자를 인증합니다.
*
* @return JwtAuthorizationFilter
*/// @Bean// public JwtAuthorizationFilter jwtAuthorizationFilter() {// return new JwtAuthorizationFilter();// }
}
2. CustomAuthenticationFilter.java
💡CustomAuthenticationFilter.java
- 해당 메서드 내에서 AuthenticationManager를 호출하여 전달합니다.
- 인증 성공 시 CustomAuthSuccessHandler를 호출하고, 실패 시 CustomAuthFailureHandler를 호출합니다. - 커스텀을 수행한 '인증' 필터로 접근 URL, 데이터 전달 방식(form) 등 인증 과정 및 인증 후 처리에 대한 설정을 구성하는 메서드입니다. - 최종 인증이 완료되면 사용자 아이디와 비밀번호 기반으로 토큰을 발급합니다.
package com.adjh.multiflexapi.config.filter;
import com.adjh.multiflexapi.model.UserDto;
import com.fasterxml.jackson.core.JsonParser;
import com.fasterxml.jackson.databind.ObjectMapper;
import lombok.extern.slf4j.Slf4j;
import org.springframework.security.authentication.AuthenticationManager;
import org.springframework.security.authentication.UsernamePasswordAuthenticationToken;
import org.springframework.security.core.Authentication;
import org.springframework.security.core.AuthenticationException;
import org.springframework.security.core.userdetails.UsernameNotFoundException;
import org.springframework.security.web.authentication.UsernamePasswordAuthenticationFilter;
import javax.servlet.http.HttpServletRequest;
import javax.servlet.http.HttpServletResponse;
/**
* 아이디와 비밀번호 기반의 데이터를 Form 데이터로 전송을 받아 '인증'을 담당하는 필터입니다.
*/@Slf4jpublicclassCustomAuthenticationFilterextendsUsernamePasswordAuthenticationFilter{
publicCustomAuthenticationFilter(AuthenticationManager authenticationManager){
super.setAuthenticationManager(authenticationManager);
}
/**
* 지정된 URL로 form 전송을 하였을 경우 파라미터 정보를 가져온다.
*
* @param request from which to extract parameters and perform the authentication
* @param response the response, which may be needed if the implementation has to do a
* redirect as part of a multi-stage authentication process (such as OpenID).
* @return Authentication {}
* @throws AuthenticationException {}
*/@Overridepublic Authentication attemptAuthentication(HttpServletRequest request, HttpServletResponse response)throws AuthenticationException {
UsernamePasswordAuthenticationToken authRequest;
try {
authRequest = getAuthRequest(request);
setDetails(request, authRequest);
} catch (Exception e) {
thrownew RuntimeException(e);
}
returnthis.getAuthenticationManager().authenticate(authRequest);
}
/**
* Request로 받은 ID와 패스워드 기반으로 토큰을 발급한다.
*
* @param request HttpServletRequest
* @return UsernamePasswordAuthenticationToken
* @throws Exception e
*/private UsernamePasswordAuthenticationToken getAuthRequest(HttpServletRequest request)throws Exception {
try {
ObjectMapper objectMapper = new ObjectMapper();
objectMapper.configure(JsonParser.Feature.AUTO_CLOSE_SOURCE, true);
UserDto user = objectMapper.readValue(request.getInputStream(), UserDto.class);
log.debug("1.CustomAuthenticationFilter :: userId:" + user.getUserId() + " userPw:" + user.getUserPw());
// ID와 패스워드를 기반으로 토큰 발급returnnew UsernamePasswordAuthenticationToken(user.getUserId(), user.getUserPw());
} catch (UsernameNotFoundException ae) {
thrownew UsernameNotFoundException(ae.getMessage());
} catch (Exception e) {
thrownew Exception(e.getMessage(), e.getCause());
}
}
}
3. CustomAuthenticationProvider.java
💡CustomAuthenticationProvider.java
- 전달받은 사용자의 아이디와 비밀번호를 기반으로 비즈니스 로직을 처리하여 사용자의 ‘인증’에 대해서 검증을 수행하는 클래스입니다.
- CustomAuthenticationFilter로부터 생성한 토큰을 통하여 ‘UserDetailsService’를 통해 데이터베이스에서 정보를 조회합니다.
package com.adjh.multiflexapi.config.handler;
import com.adjh.multiflexapi.model.UserDetailsDto;
import com.adjh.multiflexapi.model.UserDto;
import lombok.NonNull;
import lombok.RequiredArgsConstructor;
import lombok.extern.slf4j.Slf4j;
import org.springframework.security.authentication.AuthenticationProvider;
import org.springframework.security.authentication.BadCredentialsException;
import org.springframework.security.authentication.UsernamePasswordAuthenticationToken;
import org.springframework.security.core.Authentication;
import org.springframework.security.core.AuthenticationException;
import org.springframework.security.core.userdetails.UserDetailsService;
import org.springframework.security.crypto.bcrypt.BCryptPasswordEncoder;
import javax.annotation.Resource;
/**
* 전달받은 사용자의 아이디와 비밀번호를 기반으로 비즈니스 로직을 처리하여 사용자의 ‘인증’에 대해서 검증을 수행하는 클래스입니다.
* CustomAuthenticationFilter로 부터 생성한 토큰을 통하여 ‘UserDetailsService’를 통해 데이터베이스 내에서 정보를 조회합니다.
*/@Slf4j@RequiredArgsConstructorpublicclassCustomAuthenticationProviderimplementsAuthenticationProvider{
@Resourceprivate UserDetailsService userDetailsService;
@NonNullprivate BCryptPasswordEncoder passwordEncoder;
@Overridepublic Authentication authenticate(Authentication authentication)throws AuthenticationException {
log.debug("2.CustomAuthenticationProvider");
UsernamePasswordAuthenticationToken token = (UsernamePasswordAuthenticationToken) authentication;
// 'AuthenticaionFilter' 에서 생성된 토큰으로부터 아이디와 비밀번호를 조회함
String userId = token.getName();
String userPw = (String) token.getCredentials();
// Spring Security - UserDetailsService를 통해 DB에서 아이디로 사용자 조회
UserDetailsDto userDetailsDto = (UserDetailsDto) userDetailsService.loadUserByUsername(userId);
if (!(userDetailsDto.getUserPw().equalsIgnoreCase(userPw) && userDetailsDto.getUserPw().equalsIgnoreCase(userPw))) {
thrownew BadCredentialsException(userDetailsDto.getUserNm() + "Invalid password");
}
returnnew UsernamePasswordAuthenticationToken(userDetailsDto, userPw, userDetailsDto.getAuthorities());
}
@Overridepublicbooleansupports(Class<?> authentication){
return authentication.equals(UsernamePasswordAuthenticationToken.class);
}
}
4. CustomAuthSuccessHandler.java
💡CustomAuthSuccessHandler.java
- 사용자의 ‘인증’에 대해 성공하였을 경우, 수행되는 Handler로 성공에 대한 사용자에게 반환 값을 구성하여 전달하는 클래스입니다.
package com.adjh.multiflexapi.config.handler;
import com.adjh.multiflexapi.common.utils.ConvertUtil;
import com.adjh.multiflexapi.model.UserDetailsDto;
import com.adjh.multiflexapi.model.UserDto;
import lombok.extern.slf4j.Slf4j;
import org.json.simple.JSONObject;
import org.springframework.context.annotation.Configuration;
import org.springframework.security.core.Authentication;
import org.springframework.security.web.authentication.SavedRequestAwareAuthenticationSuccessHandler;
import javax.servlet.http.HttpServletRequest;
import javax.servlet.http.HttpServletResponse;
import java.io.IOException;
import java.io.PrintWriter;
import java.util.HashMap;
/**
* 사용자의 ‘인증’에 대해 성공하였을 경우 수행되는 Handler로 성공에 대한 사용자에게 반환값을 구성하여 전달합니다
*/@Slf4j@ConfigurationpublicclassCustomAuthSuccessHandlerextendsSavedRequestAwareAuthenticationSuccessHandler{
@OverridepublicvoidonAuthenticationSuccess(HttpServletRequest request, HttpServletResponse response,
Authentication authentication)throws IOException {
log.debug("3.CustomLoginSuccessHandler");
// [STEP1] 사용자와 관련된 정보를 모두 조회합니다.
UserDto userDto = ((UserDetailsDto) authentication.getPrincipal()).getUserDto();
// [STEP2] 조회한 데이터를 JSONObject 형태로 파싱을 수행합니다.
JSONObject userVoObj = (JSONObject) ConvertUtil.convertObjectToJsonObject(userDto);
HashMap<String, Object> responseMap = new HashMap<>();
JSONObject jsonObject;
// [STEP3-1] 사용자의 상태가 '휴면 상태' 인 경우 응답 값으로 전달 할 데이터if (userDto.getUserSt().equals("D")) {
responseMap.put("userInfo", userVoObj);
responseMap.put("resultCode", 9001);
responseMap.put("token", null);
responseMap.put("failMsg", "휴면 계정입니다.");
jsonObject = new JSONObject(responseMap);
}
// [STEP3-2] 사용자의 상태가 '휴면 상태'가 아닌 경우 응답 값으로 전달 할 데이터else {
// 1. 일반 계정일 경우 데이터 세팅
responseMap.put("userInfo", userVoObj);
responseMap.put("resultCode", 200);
responseMap.put("failMsg", null);
jsonObject = new JSONObject(responseMap);
// TODO: 추후 JWT 발급에 사용 할 예정// String token = TokenUtils.generateJwtToken(userVo);// jsonObject.put("token", token);// response.addHeader(AuthConstants.AUTH_HEADER, AuthConstants.TOKEN_TYPE + " " + token);
}
// [STEP4] 구성한 응답 값을 전달합니다.
response.setCharacterEncoding("UTF-8");
response.setContentType("application/json");
PrintWriter printWriter = response.getWriter();
printWriter.print(jsonObject); // 최종 저장된 '사용자 정보', '사이트 정보' Front 전달
printWriter.flush();
printWriter.close();
}
}
5. CustomAuthFailureHandler.java
💡CustomAuthFailureHandler.java - 사용자의 ‘인증’에 대해 실패하였을 경우, 수행되는 Handler로 실패에 대한 사용자에게 반환값을 구성하여 전달하는 클래스입니다.
package com.adjh.multiflexapi.config.handler;
import lombok.extern.slf4j.Slf4j;
import org.json.simple.JSONObject;
import org.springframework.context.annotation.Configuration;
import org.springframework.security.authentication.*;
import org.springframework.security.core.AuthenticationException;
import org.springframework.security.web.authentication.AuthenticationFailureHandler;
import javax.servlet.http.HttpServletRequest;
import javax.servlet.http.HttpServletResponse;
import java.io.IOException;
import java.io.PrintWriter;
import java.util.HashMap;
/**
* 사용자의 ‘인증’에 대해 실패하였을 경우 수행되는 Handler로 실패에 대한 사용자에게 반환값을 구성하여 전달합니다.
*/@Slf4j@ConfigurationpublicclassCustomAuthFailureHandlerimplementsAuthenticationFailureHandler{
@OverridepublicvoidonAuthenticationFailure(HttpServletRequest request, HttpServletResponse response,
AuthenticationException exception)throws IOException {
// [STEP1] 클라이언트로 전달 할 응답 값을 구성합니다.
JSONObject jsonObject = new JSONObject();
String failMsg = "";
// [STEP2] 발생한 Exception 에 대해서 확인합니다.if (exception instanceof AuthenticationServiceException) {
failMsg = "로그인 정보가 일치하지 않습니다.";
} elseif (exception instanceof BadCredentialsException) {
failMsg = "로그인 정보가 일치하지 않습니다.";
} elseif (exception instanceof LockedException) {
failMsg = "로그인 정보가 일치하지 않습니다.";
} elseif (exception instanceof DisabledException) {
failMsg = "로그인 정보가 일치하지 않습니다.";
} elseif (exception instanceof AccountExpiredException) {
failMsg = "로그인 정보가 일치하지 않습니다.";
} elseif (exception instanceof CredentialsExpiredException) {
failMsg = "로그인 정보가 일치하지 않습니다.";
}
// [STEP4] 응답 값을 구성하고 전달합니다.
response.setCharacterEncoding("UTF-8");
response.setContentType("application/json");
PrintWriter printWriter = response.getWriter();
log.debug(failMsg);
HashMap<String, Object> resultMap = new HashMap<>();
resultMap.put("userInfo", null);
resultMap.put("resultCode", 9999);
resultMap.put("failMsg", failMsg);
jsonObject = new JSONObject(resultMap);
printWriter.print(jsonObject);
printWriter.flush();
printWriter.close();
}
}
5) 작업 테스트 하기
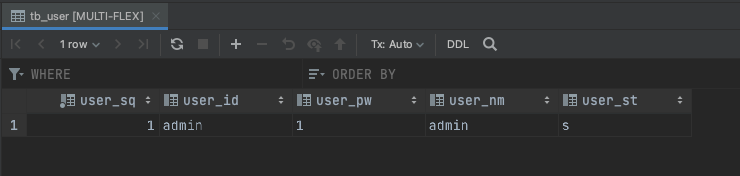
1. DB 데이터 확인
💡 tb_user 테이블에 user_id로 "admin"과 user_pw로 "1"을 지정한 데이터를 작성하였습니다.
2. URL 호출하기
💡 CustomAuthenticationFilter내에 setFilterProcessesUrl로 지정한 값으로 호출을 해봅니다.
3. 데이터 확인
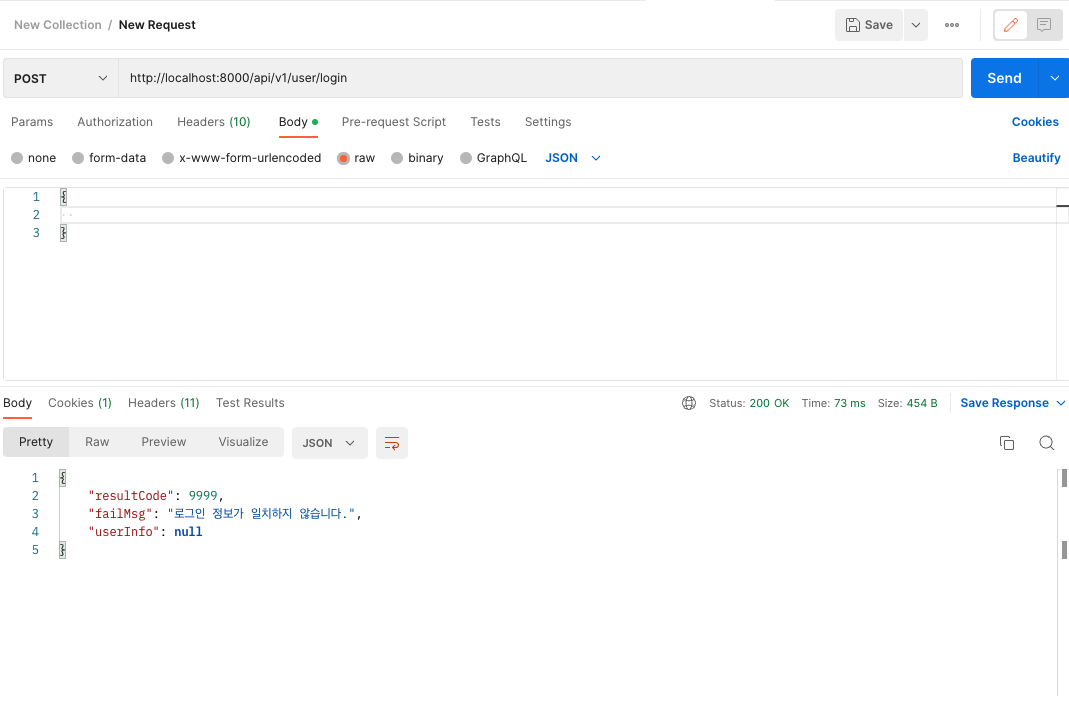
3.1. 사용자 정보를 인증하지 못한 경우
💡 데이터 값이 존재하지 않는 경우 (로그인 정보가 존재하지 않는 경우) [ Spring Security 수행과정 ]
1. 로그 상으로 CustomAuthenticationFilter의 수행을 확인하였습니다. 2. 로그 상으로 CustomAuthenticationProvider를 수행하였으나 데이터가 존재하지 않아서 CustomAuthFailureHandler로 이동하여 에러 메시지를 발생시켰습니다.
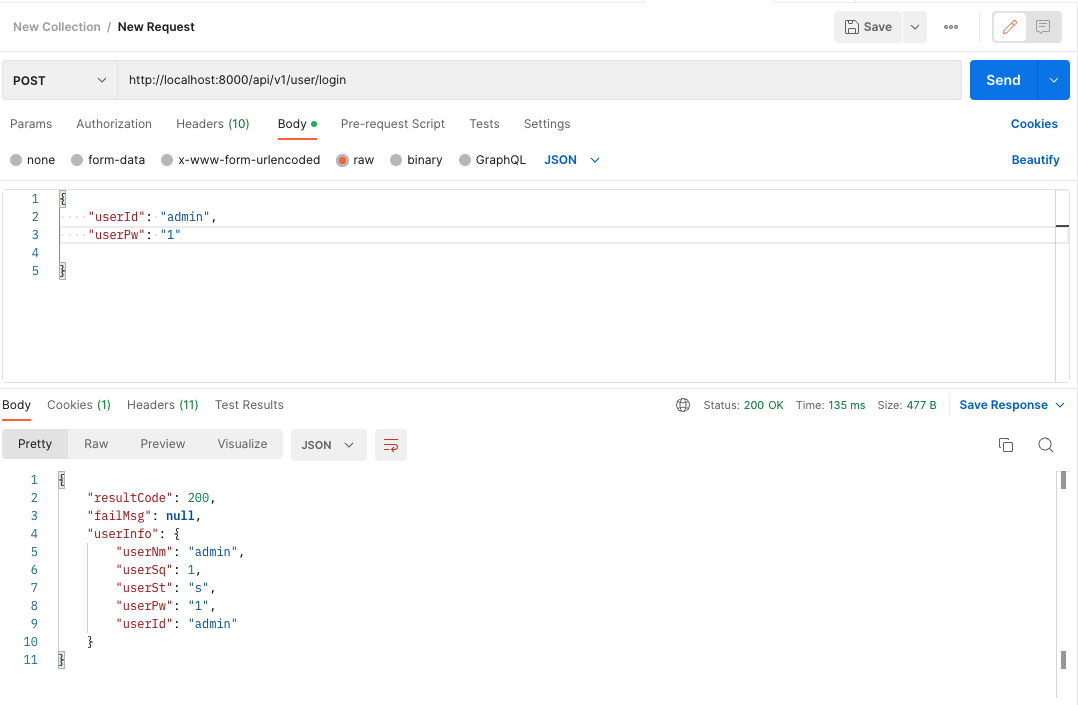
3.2. 사용자 정보를 인증한 경우
💡 데이터 값이 존재하는 경우 -> 사용자 정보를 인증한 경우
[ Spring Security 수행과정 ]
1. 로그 상으로 CustomAuthenticationFilter의 수행을 확인하였습니다. 2. 로그 상으로 CustomAuthenticationProvider를 수행하여 데이터 조회를 수행을 확인하였습니다. 3. 로그 상으로 CustomLoginSuccessHandler를 잘 수행하여 응답 값을 반환받음을 확인하였습니다.
[참고] Spring Security의 인증 방법으로 JWT를 이용한 인증 방법에 대한 이해에 대해서 공유드립니다.